Made Clothing Co.

Product Rendering for a Toronto-Based
Men’s Fashion Brand

Client
3D Design
Product Rendering
3D rendering of a blue dress-shirt

DESCRIPTION

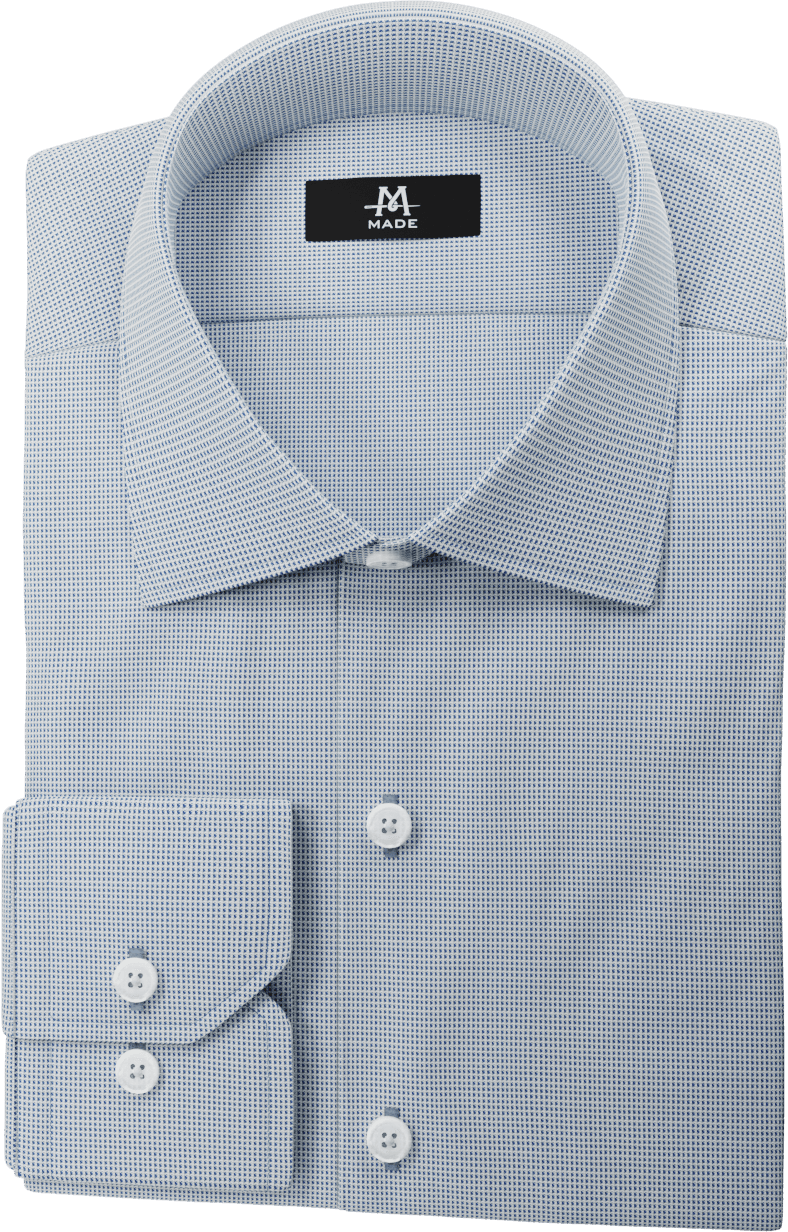
MADE Clothing Co. reached out to me to work together in creating a dress shirt customization tool for their webstore. With the software already built, they needed an artist to create realistic renderings of their shirt components and fabrics.

DELIVERABLES

  • 10 object models
  • 40+ custom textures
  • 600+ unique images

ROLES

  • 3D Designer / Generalist

TIMELINE

3 active months
of a 6 month partnership

TOOLS

Blender 3D
Photoshop
Python

CLIENT

With a brand rooted in personalization,
MADE aimed to bring their bespoke offerings online

A stylish man wearing a casual dress shirt in front of a cityscape

An offering central to MADE’s image and reputation is having an on-site stylist to help customers find their best-suited look. However, at the time, they didn’t feel their webstore reflected these offerings.

GOAL

Provide online customers with the same flexibility as in-store clientele with a dress shirt configurator

MADE needed identical images of their offerings to slot into their software, without separately photographing each shirt. These would also become product thumbnails for their online store.

NEEDS

MADE required:

Photorealism

Images need to be 1 to 1 with the product the customer receives

Consistency

Seamless switching between component styles and materials

Scalability

40+ fabric variations, with a scalable approach to add more materials down the road

Experimentation

With the software still being ironed-out, room for testing was needed in the early stages

OUTCOME

Final configurator

A live demo video of MADE's dress shirt configuration tool being used on their website.  Powered by the image components created in this study.
An image of an elderly tailor working with cloth

Building product renders

DEVELOPMENT PIPELINE

Workflow overview

Modelling
Sculpting
Creating Textures
Scripting
Texturing
Composing
Compositing
Rendering

SCOPE

Required 3D assets

Collars

Plackets

Cuffs

Base

Preview

A 3D rendering of a fabric thumbnail in a material known as 'canvas 5'
A 3D rendering of a fabric thumbnail in a material known as '755039'
A 3D rendering of a fabric thumbnail in a material known as '755032'
A 3D rendering of a fabric thumbnail in a material known as '755027'

CONSIDERATIONS

Understanding shirt anatomy to create
accurate models

A few key considerations when designing the shirt models that needed to be just right in order to accurately reflect MADE’s products:

A close up of the neck hole of a dress shirt, highlighting the seams along the shoulder and back

Seam positions

Shirt proportions, and placement of the main seams

A close up rendering of a shirt collar meeting the base of the shirt, highlighting the indentations which follow the seams

Seam indents

Making the object feel like real cloth, indented by the seams holding it together

A close up rendering of a cuff resting on a shirt base, with buttons in various positions

Button positions

Which components have buttons, and where those buttons are placed

A close up rendering of the neck-hole of a shirt, focusing on the contour of the collar

Collar shape

Ensuring all collars match the contours and shape of the base shirt

MODELS

A 3D rendering of a purple wide shirt collar isolated against a blank background
A 3D rendering of a purple mini-wide shirt collar isolated against a blank background
A 3D rendering of a purple band shirt collar isolated against a blank background
A 3D rendering of a purple standard dress-shirt cuff isolated against a blank background
A 3D rendering of a purple french shirt cuff isolated against a blank background
A mat-cap rendering of a dress shirt before imperfections had been sculpted into the model
Before
A mat-cap rendering of a dress shirt after imperfections had been sculpted into the model
After

IMPERFECTIONS

Nothing real is perfect,
but too imperfect
is just messy

With MADE’s goal of photorealism, the shirts needed an accurate ruffle to their appearance, without losing their high-fashion image. Too few wrinkles and the shirts looked starched to death. Too many imperfections and they looked straight out of the hamper.

They needed just a light touch of wrinkles, which varied across components due to their construction. Ex. Some collars had stiffer reinforcements than others.

The shirts now needed to be textured
using MADE’s own fabric swatches

WORKFLOW

Converting
fabric swatches
to 3D textures

In order for the models to reflect actual products, they needed to be textured with over 40 scans of MADE’s custom fabrics.

Working closely together, I tested several workflows for converting fabric scans to 3D textures. This allowed me to determine which was the most time-efficient, best-looking, and scalable; as MADE needed the capability to rapidly add fabrics in the future.

I used a combination of Blender and Photoshop to undistort the scans, and create the repeatable textures. Chosen for its efficiency, and compatibility with MADE’s scanning hardware.

Fabric Scan

A high res scan of white and blue stripped fabric

Cropped

A high res scan of white and blue stripped fabric, cropped down to only show only a small portion, one grid square, of the fabric

Traced

A high res scan of white and blue stripped fabric, cropped down to only show only a small portion, one grid square, of the fabric, with the grid lines traced over the fabric

Straightened

A high res scan of white and blue stripped fabric, cropped down to only show only a small portion, one grid square, of the fabric, now perfectly straight where the previous gridlines had highlighted the fabric's natural imperfections

Repeatable texture

A zoomed out view of the previous 'straightened' image, showing that after having now been straightended it could be repeated to create a seamless texture after more modifications in photoshop

3D material

A 3D rendering of a material sample made from the repeating texture created in the previous image

CONTRAST AREAS

Adding customizable
accent fabric to reflect
in-store offerings

‘Contrast areas’ are the parts of the dress shirt which accent it with an alternate fabric pallet. They were a critical project requirement as the online tool needed to represent the full scope of the customization available, which includes personalized accents.
A 3D rendering of a shirt model with a wide collar where the inner fabric of the collar and cuff is pulsing with white light to act as a visual guide for what a contrast fabric is and where they are located
A 3D rendering of a mini-wide-collar dress shirt with contrast fabric.  The base fabric is then horizontally wiped away and replaced with a mat-cap texture, leaving only the contrast fabric.  From there, the contrast fabrics begin cycling through a series of different colors and patters.
Our goal was to give shoppers the ability to alter their shirt’s accent fabric with 40+ available materials.
A 3D rendering of a wide-collar dress shirt with contrast fabric.  The base fabric is then horizontally wiped away and replaced with a mat-cap texture, leaving only the contrast fabric.  From there, the contrast fabrics begin cycling through a series of different colors and patters.
To enable this, the inner lining of all 3 collars, and 1 cuff, needed to be isolated, and rendered as separate images.

ADDITIONAL DETAILS

The devil is in the details / the realism is in the seams

Lastly, the following details were added to increase the accuracy of the objects in relation to the real-world products, and the subtleties of their design.
A close-up rendering of the stitching on a dress shirt, showing that it is color matched to the shirt fabric

Color-matched threading

I manually approximated fitting thread colors for each shirt material. Simple for solid colors, trickier with complex patterns.
A close up rendering of a button-hole on a dress shirt, showing that it is color matched to the shirt fabric

Color-matched buttonholes

Buttonhole colors for each material were done separately, in a similar way to the threading. Requiring their own fine-tuning.
A split image of a dark shirt and a light shirt, showing that each has a different button color

Button color

Either a dark or light button was assigned to each shirt material respective of its colour.
A close up rendering of the logo tag of a dress shirt

MADE Logo tag

Added with a focus on legibility, without being overbearing.
A light blue dress shirt with no contrast fabric, a mini-wide collar, French cuff, light buttons, and regular cuff.
A light grey dress shirt with plaid contrast fabric, a wide collar, regular cuff, and light buttons.
A dark blue dress shirt with grey contrast fabric, a French cuff, dark buttons, and mini-wide collar.
A dark grey dress shirt with stripped contrast fabric, a mini wide collar, regular cuff, and white buttons.
A light blue dress shirt with white contrast fabric, a band collar, regular cuff, and light buttons.
A very light blue dress shirt with no contrast fabric, a wide collar, French cuff, light buttons, and regular cuff.
A high fidelity 3D rendering of a dress shirt with the final lighting applied
Before
A high fidelity 3D rendering of a dress shirt with full-bright lighting applied
After

LIGHTING

Lighting
the final composition

MADE’s design goals were on soft, consistent lighting, without it being so flat that shirts appear bland or even artificial. Gentle shadows, with nothing distracting from the product.

SHADOWS

Supporting the final use case by embedding shadows within each component image

Our goal was to create separate images of shirt components that could be stacked to form a complete product photo. Therefore, to maintain realism, each image needed to be a combination of the shirt component, and its shadow behind it. Thereby allowing the shirt pieces to accurately sit atop each other without looking flat, or uncanny.

Adding generic ‘drop-shadows’ could quickly achieve this outcome, but it would sacrifice photorealism. To do this without compromise, I created isolated renderings of each shadow, and combined the images in post. This is the difference between each method:

Drop-shadows:

A rendering of the previously seen dress shirt's component stacked on top of each other with a generic drop shadow applied to each

Rendered shadows:

A high fidelity 3D rendering of a dress shirt with full-bright lighting applied

POST-PROCESSING

Creating isolated, physically accurate shadows

Target component

A close up rendering of the cuff resting on top of a dress shirt, with the shirt base behind the cuff being low opacity.

Hidden from render

A close up rendering of the location where the cuff would be sitting on top of a dress shirt, with the cuff now being invisible, with only its shadow left in its place

Isolated shadow

A close up rendering of the location where the cuff would be sitting on top of a dress shirt, with both the cuff and the base shirt behind it now being invisible, leaving only the shadows cast by the cuff, which also form a faint outline of the shirt

Edited

A close up rendering of the location where the cuff would be sitting on top of a dress shirt, with both the cuff and the base shirt behind it now being invisible.  The shadows have been post processed to be more crisp and defined, and the shirt outline has been removed. Leaving a perfect shadow that would physically be cast by the cuff onto shirt

Combined

A close up rendering of a shirt cuff with a physcially accurate shadow being cast behind it onto a transparent background

Final

a close up rendering of a dress shirt cuff casting a physically accurate shadow onto the shirt base behind it

ROADBLOCKS TO RENDERING

Working around my hardware limitations

With my incredibly underpowered PC, I was unable to complete the rendering for the entire project in a reasonable amount of time. To solve this, I used an online render farm service.

This required me to build my 3D project file in such a way that it could produce the hundreds of images in one continuous session, so as to not waste time starting and stopping render jobs.

However, the rendering service I used had strict file size limitations. This greatly impacted my available options when trying to build a file that could render all the images continuously.

Possible approaches to creating a continuous render sequence:

Move the virtual camera
across multiple objects

A motion graphic animation with a dress shirt in center frame.  A camera shutter surrounds it and captures an image of the shirt.  The shirt then slides off frame to the left, and is replaced by a new shirt with a different pattern which comes in from the right. The image is captured once again, and the cycle continues.  This animation represents one potential approach for rendering the shirt components I created for MADE.  The approach was to have a series of identical objects that would each be rendered individually.
-Huge file size due to number of objects
-Harder to edit / less scalable
-Easy to set-up

Stationary camera, with one object
that changes materials

A motion graphic animation with a dress shirt in center frame.  A camera shutter surrounds it and captures an image of the shirt.  The shirt then undergoes a wipe transition from top to bottom and its color/pattern changes. The image is captured once again, and the cycle continues.  This animation represents one potential approach for rendering the shirt components I created for MADE. The approach was to have a single object that would be able to dynamically change its pattern every frame.  Meaning the 3D scene only had one object, rather than a series of identical objects.
-Tiny file size
-Future-proof, scalable, easy to manipulate
-More involved set-up process

ROADBLOCKS TO RENDERING

Using Python to create a dynamic texture that could change fabric every frame

Pursuing the latter solution, I wrote a python script which created a single 3D material containing all 41 fabrics, and had the ability to easily switch between them.

From there, I could then render a single “video” whose frames contained every combination of object and fabric. This allowed me to push through the limits of my hardware and completed all of the rendering at no added cost to the project timeline.

A motion graphic animation which describes the underlying system used to power the second approach described above, the approach with only one shirt which can change its pattern.  The animation shows 3 nodes on the left side of the screen, each representing a different pattern.  The three nodes are plugged into a much larger center node titled 'Switcher'.  The switcher node is then plugged into the shirt object on the right side of the animation.  Even though all 3 pattern nodes on the left are plugged into the switcher, only the first has a 'live' connection which is fully opaque compared to the rest.  This was decided by a numeric dial on the switcher node which currently reads '1'.  As a result, the switcher assigns the first material to the shirt.  The animation is then built around the numeric dial being changed to '2' and '3' to show how with each value change, a different pattern in the sequence is selected and assigned to the shirt.
A 3D rendering of a foundation makeup bottle product shot.  The bottle's label reads 'Jabbar & Co.'. The bottle cycles through a series of different skin tone colors to demonstrate how the previously described system was scaleable and was able to be reused in a later project of mine.

Benefits of a
scalable approach

I’ve been able to tweak and reuse this same script numerous times since developing it for this project.

Many of my product rendering tasks employ this same workflow of having one object cycle through X materials. As such, choosing to create a strong, future-proof solution to this issue has since saved me countless hours.

With rendering now complete, the final images
were delivered, and placed into the webstore’s
new customization tool

A rendering of a shirt lying on a tabletop

Delivered Project

Final configurator

A live demo video of MADE's dress shirt configuration tool being used on their website.  Powered by the image components created in this study.
A blue dress shirt with white contrast fabric, a mini-wide collar, regular cuff, and white buttons
A grey dress shirt with paisley contrast fabric, a mini-wide collar, regular cuff, and white buttons
A green dress shirt with white contrast fabric, a mini-wide collar, regular cuff, and dark buttons
A very light purple dress shirt with grey contrast fabric, a wide collar, french cuff, and no contrast fabric
A green plaid dress shirt with no contrast fabric, a wide collar, regular cuff, and dark buttons
A light blue dress shirt with no contrast fabric, a wide collar, regular cuff, and white buttons
A dark grey dress shirt with no contrast fabric, a band collar, french cuff, and white buttons
A navy blue dress shirt with spotted contrast fabric, a band collar, regular cuff, and dark buttons
A very light blue dress shirt with white contrast fabric, a band collar, regular cuff, and white buttons
The text 'MADE' rendered in blue fuzzy fabric letters

SUCCESSES

Foresight, and planning around project requirements

During this project’s early stages, I identified many requirements to suit my client’s needs. An example of this was when we first discussed creating a single shirt from stacked image layers. With this goal understood, I was able to discern the steps necessary to match the use case. I knew each image needed their object’s shadows placed in the background. Otherwise, they wouldn’t combine realistically.

This gave me significant time to plan ahead. I conducted tests using the first few models, and determined the best approach to creating realistic shadows. In this way, I built the project from the ground up with the eventuality of this challenge in mind. Then, when the time came to create the objects’ shadows, I was fully prepared to traverse the issue. With this, and other similar moments, the greatest success of this project was my foresight and planning.

LEARNING

Scalable, future-proof foundations, over band-aid solutions

This was a relatively long-term project with big plans for future expansion. As such, I often had to make critical decisions on how to best spend my resources. At the center of these decisions was usually a common internal question. Should I take the time to craft a lasting foundation to address an issue, or use a more temporary solution? The latter allots more time to other important tasks. But, the former is more likely to increase efficiency throughout the project.

As the project went on, time and again I felt vindicated in choosing the former. These solutions included working non-destructively when possible, and writing flexible, responsive scripts. Long-term fixes consistently saved me more time than hasty band-aid solutions. As a result, this project serves as an important learning experience. During long-term projects, especially in a 3D space, a strong foundation is incredibly important. They almost always save more resources in the end, and may even apply to future projects.

AREAS OF GROWTH

Over fixation on a single aspect of a task

After modelling, my objects needed to be UV-unwrapped so I could add their fabric textures. As I was working on the shirt collars, I made the mistake of fixating on how they appeared in a small sampling of fabrics. Rather than checking each texture, and comparing them to my references. This caused me to think that the models were ready to be rendered, so I sent them off. When the images arrived, I finally realized the mistake. Some of the fabrics appeared distorted, and needed revision. Thankfully, I was able to correct them, re-render, and meet the intended deadline.

This teachable moment reminded me of what is possible when you lose sight of a project’s full scope. Going forward, I aim to address this by working with a broader sample size during testing, and regularly checking my project outline. Thereby reminding myself of the bigger picture, and to look ahead to the next steps towards which I’m building.

Photograph of Sam Giustizia smiling, taken from a top down perspective while he's in some kind of outdoor concrete room