MakeRight
Removing the Barriers of 3D Printing
for Everyday Consumers

DESCRIPTION
For my undergraduate capstone, I created a service that directly connects owners of 3D printers to customers in need. Based on a gig economy model, this service enables access to 3D printing without the barriers of cost, and know-how.
DELIVERABLES
- Hi-fidelity prototypes,
of 2 user flows - 30+ Unique screens
ROLES
- UX/UI Designer
- UX Researcher
- Frontend Dev
- Graphic Design
TIMELINE
6 Months
TOOLS
BACKGROUND
3D printing is yet to reach
its full potential
Offering endless customization, cheap manufacturing, and fast production speeds.
3D printing has a vast potential to benefit everyday consumers.
In the early 2010s, we were told they would be found in every home; giving consumers the power to create anything. But, its barriers were too great to reach these expectations, and this reality fell flat. Now, 3D printing hardly has any impact on the average consumer’s life.
CHALLENGE
Cost, and technical knowledge prevent mass adoption
Owning a 3D printer is a steep upfront investment, and learning to use it is a massive time-sink. Even then, users without 3D modelling experience will still be restricted to premade objects.
OPPORTUNITY
How might we remove these barriers, and translate the benefits of 3D printing to the average consumer?
SOLUTION
Connect consumers with owners of 3D printers
for stress-free, low-cost production

Choose
from a storefront of sourced 3D models, or upload your own
Choose
from a storefront of sourced 3D models, or upload your own
Tweak
and personalize
to suit your needs
Tweak
and personalize
to suit your needs
Order
your print, automatically
assigning it to one of our
verified makers
Order
your print, automatically
assigning it to one of our
verified makers
Receive
the purchased item right at your front door
Receive
the purchased item right at your front door
Slashing the overhead of competitors
Competing services ruin the low-cost benefits of 3D printing by charging steep overhead fees. This results from countless technicians and machines operating under one roof.
MakeRight undercuts this overhead by connecting customers directly to makers. Clients are only charged for the work of one technician, running their own equipment.
Operating much like an ‘Uber’
for 3D prints from local makers
Customers gain access to 3D printing’s low-cost, customizable production, without owning or operating the technology. In parallel, hobbyist makers now have an accessible platform to profit off their equipment and skills.

Building MakeRight
PROJECT PLAN
Project phases and timeline
APPROACH
Finding a focus within the field of 3D printing
Secondary research
for high-level context of the 3D printing world
Interviews & surveys
to understand users’ experiences at a lower level
SECONDARY RESEARCH
Cost and knowledge gaps prevent widespread use,
while hobbyist printers sit idle
What factors limit the adoption of 3D printing?
Hobbyists often surpass
these barriers out of passion
Only to have their printer sit idle most of the time
PRIMARY RESEARCH
Interviews with 4 makers, and 6 laypersons
corroborated these statistics
Non-printer owners have interest in the tech, and barriers
to accessing it
Despite identifying benefits of using 3D printing, these architecture students avoided it due to intimidation.
Even though, through their school, they had open access to printers.
“...In architecture, some calculations are easier when
you have a real model vs. digital...” - Layperson #6
“But I never use [3D printing] because I don’t know
how to work the machines.”
- Layperson #4
While many owners of 3D printers have idle machines, and free time
Owners’ usage depended partially on free time, but mostly on current needs and projects.
Meaning there was frequent overlap between their idle printer, and free time, due to a lack of printable ideas.
“How often do you use your printer?” - Me
“Not enough” - Owners #1-4, unanimously
‘AHA’ MOMENT
Idle printers,
potential for wider use
Primary and secondary research had converged on these 2 key takeaways. I knew my solution would be found at their intersection.
- The machines of skilled printer owners are largely idle
- Laypersons feel barred from 3D printing, despite having
several ideas and uses for the tech
METHODOLOGY
Moving from problem to solution
Brainstorming
to generate a wide number of potential solutions
Refine ideas
to fully explore promising concepts
Focus group
to gauge reception and feedback from users
REFINE IDEAS
I expanded on this chosen idea by considering:
Goals
How This Might Be Addressed
Concerns
Focus group testing on the newly refined concept
allowed me to gauge reception, and gather feedback
FOCUS GROUP TESTING
Discovering a promising enthusiasm, and some important concerns
I gathered 6 laypersons, and 4 printer owners, and asked each group questions surrounding my proposed service.
At the end of the test, I revealed the concept. I then asked more specific questions, collected feedback, and supported their discussion with prompts and clarification.
Reception was quite positive among both groups:
Laypersons commented ideas for what they would print, while makers showed excitement towards profiting off their equipment.
“I think a business like this could totally work... ...I think there’s a lot of people with printers and free time that would hop on an opportunity like this.” - Maker #2
“I would definitely use that service. Not having to set up and use a printer myself? I would print so much stuff!”- Layperson #4
With important concerns being raised, as well:
Distribution of responsibilities
Draw a line separating the responsibilities of makers, and customers.
“It’s a question of distributing responsibility. There’s 2 types of problems: maker problems, and customer problems.” - Layperson #3
Ensure a viable work experience for makers
Appropriate deadlines for printers, with some kind of flexibility.
“There’s a lot of little steps and things that go into making the print that can take time.”- Maker #3
3D modelling adds too much complication
Model creation and design is a whole service in itself; including it in the service would drastically affect scope.
“I can’t model things for people, so I’m not very interested in that side of the service.”- Maker #3
With a foundation of research, and validation from testers, it was time to begin prototyping
METHODOLOGY
Prototype scope covered the core journey of makers
and customers
The two journeys included all the main touch-points from sign-up to order fulfillment. This development goal would allow me to establish the foundation and core interactions of the service.

METHODOLOGY
The workload was divided
across 4 project phases
I broke development into 4 phases of 4-6 weeks.
Each containing its own cycles of development, testing, and iteration.
Phase 1:
Maker Journey, Low-Fi
Phase 2:
Customer Journey, Low-Fi
Phase 3:
Maker Journey, High-Fi
Phase 4:
Customer Journey, High-Fi
PROJECT ITERATIONS
Progression & refinement
Customer Journey - Item Listing (Low-Fi)
Phase 1
Customer Journey - Item Listing (High-Fi)
Phase 2
Maker Journey - File Checking (Low-Fi)
Phase 1
Maker Journey - File Checking (High-Fi)
Phase 2
NOTABLE FEEDBACK CHANGES
Significant issues addressed during testing and revision:
Some changes were a structural shift in the service’s rules and mechanics, others were simply UI and UX improvements.
Here is a smattering of the most notable issues addressed along the way.
The Manufacturer Overview
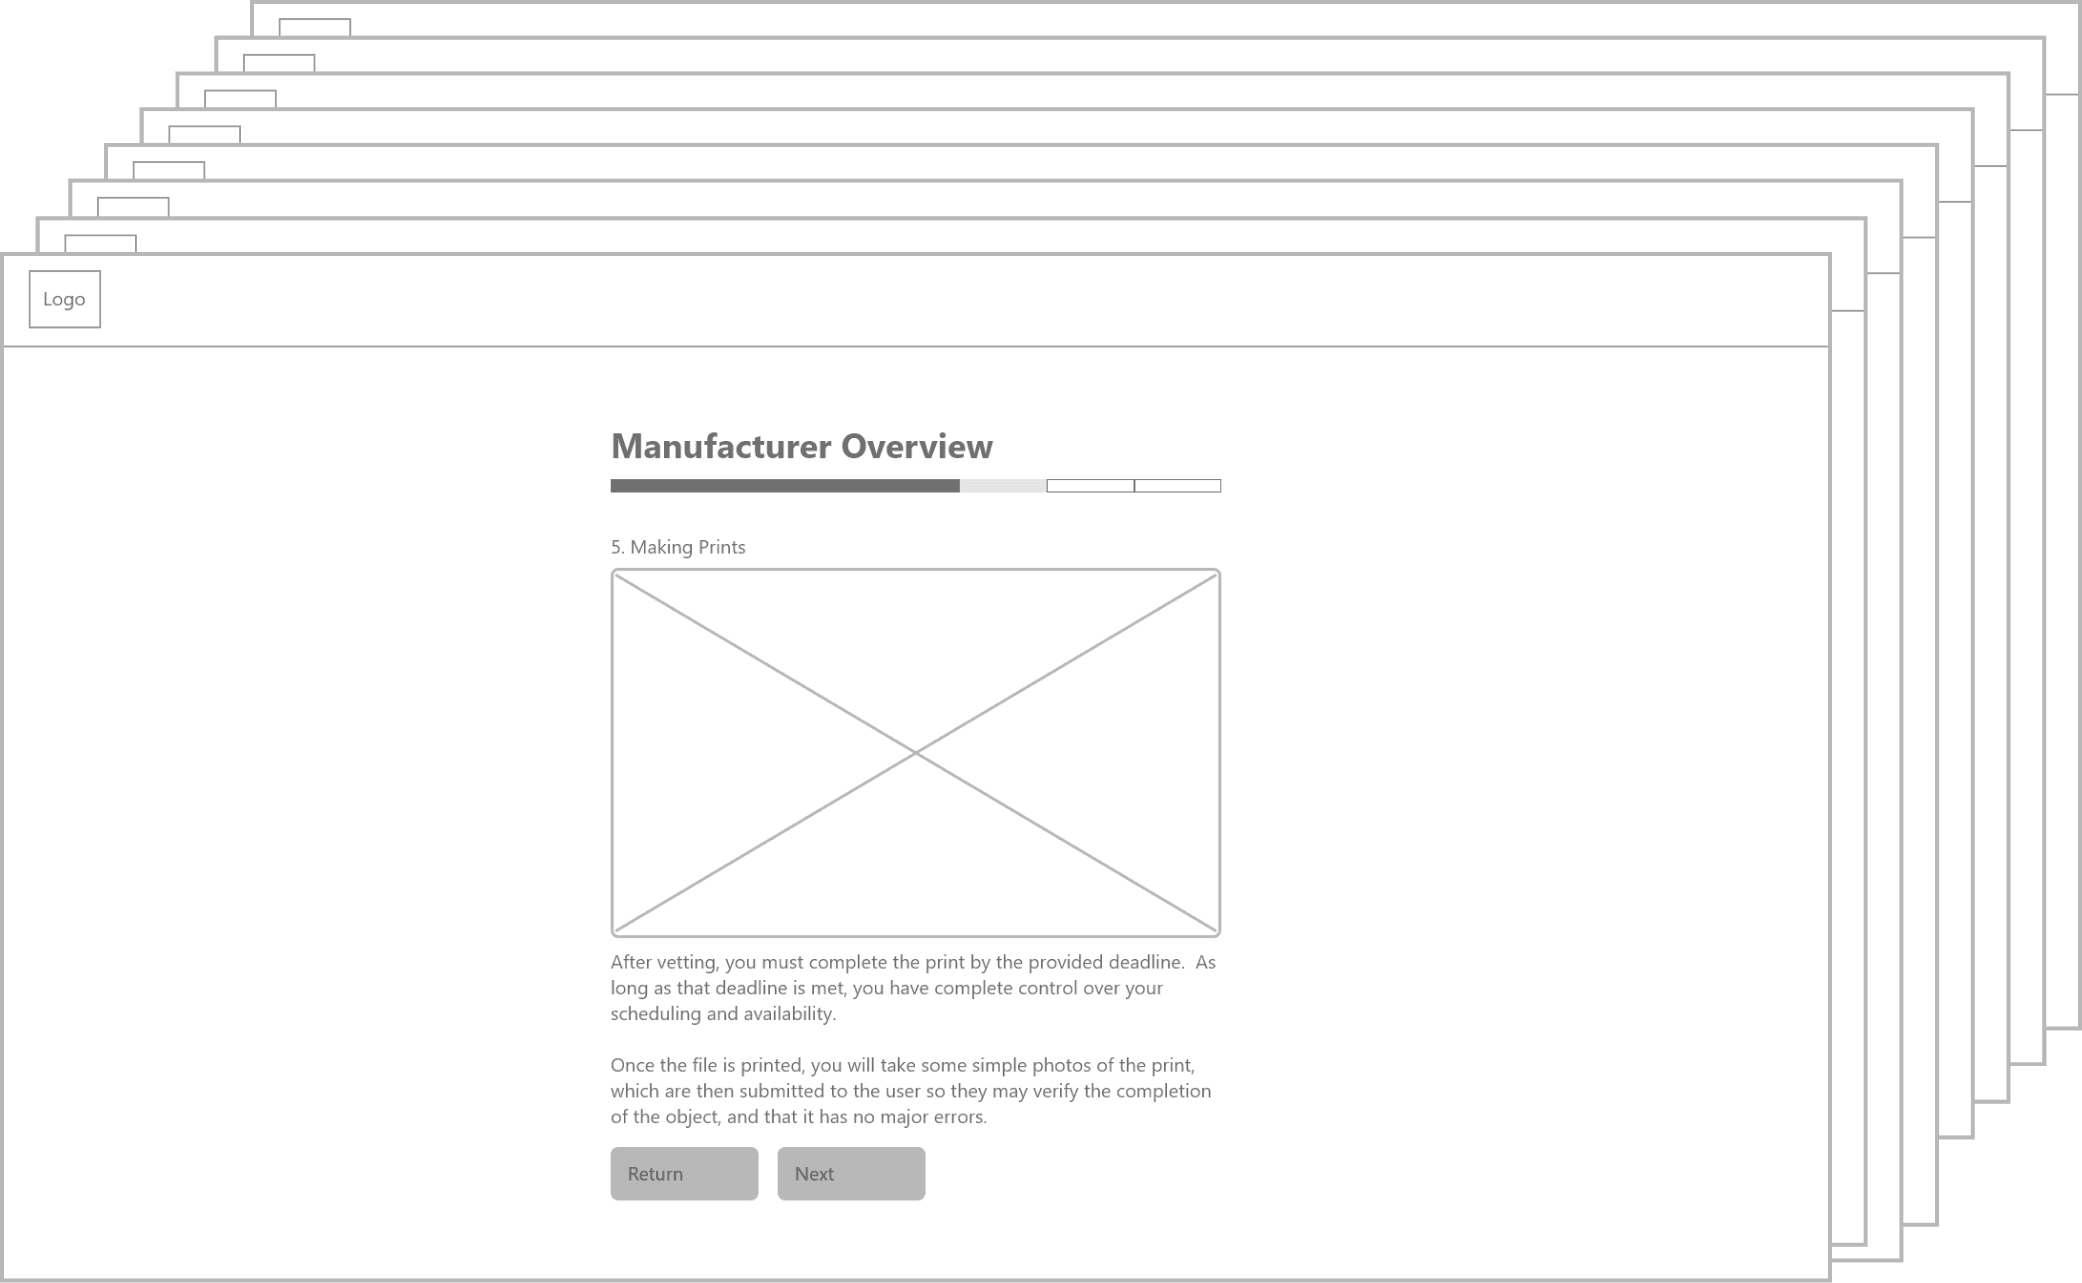
Aspiring makers need to understand the expectations of their new job. Originally, this was taught with an 8-page slideshow. But users found it droning, hard to retain, and too easy to skip.
Now, that info exists as a single inviting page. As well, I added a brief video chat at the end of onboarding to ensure new Makers have read the overview, and can ask questions.
Equipment verification
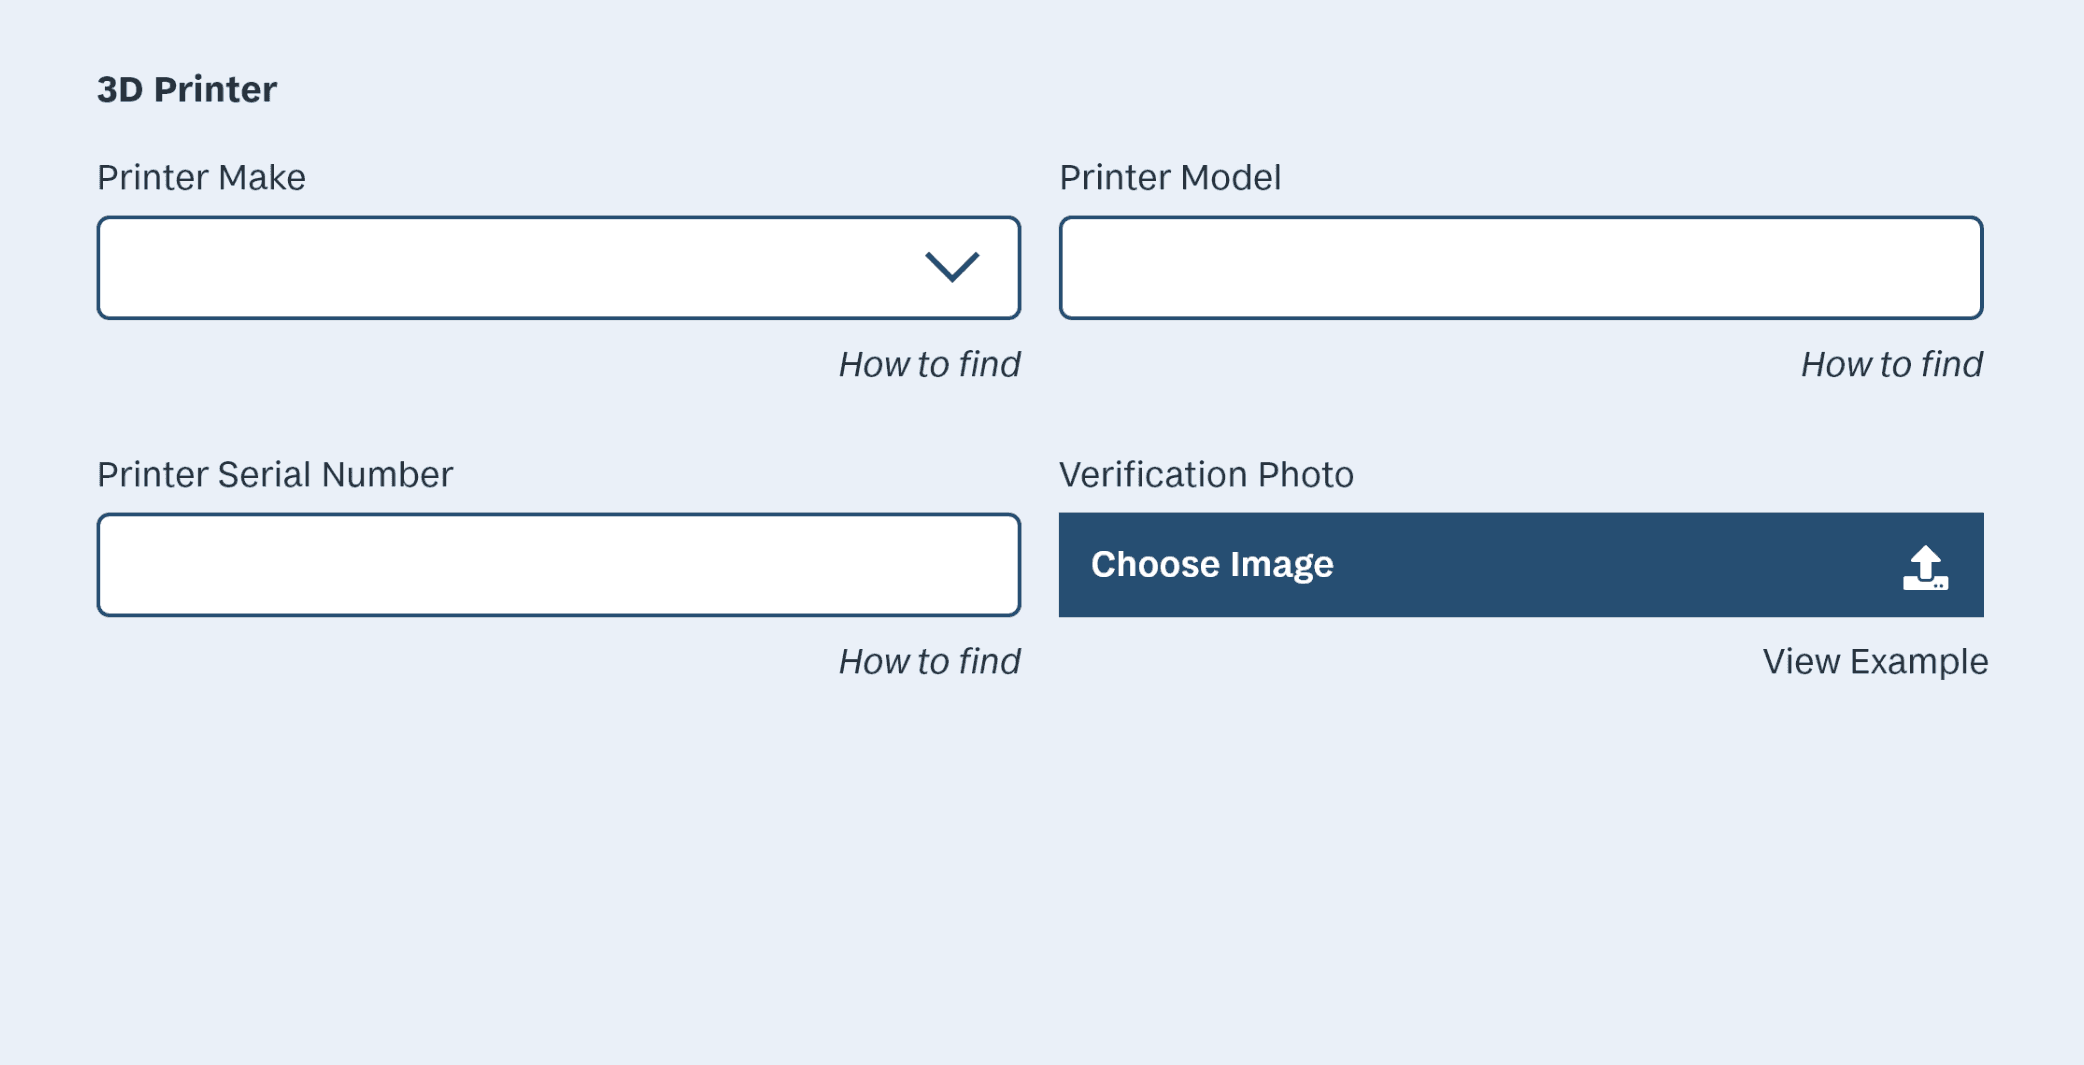
Users noted: lack of parity between printer and filament inputs, and the inability to add multiple printers.
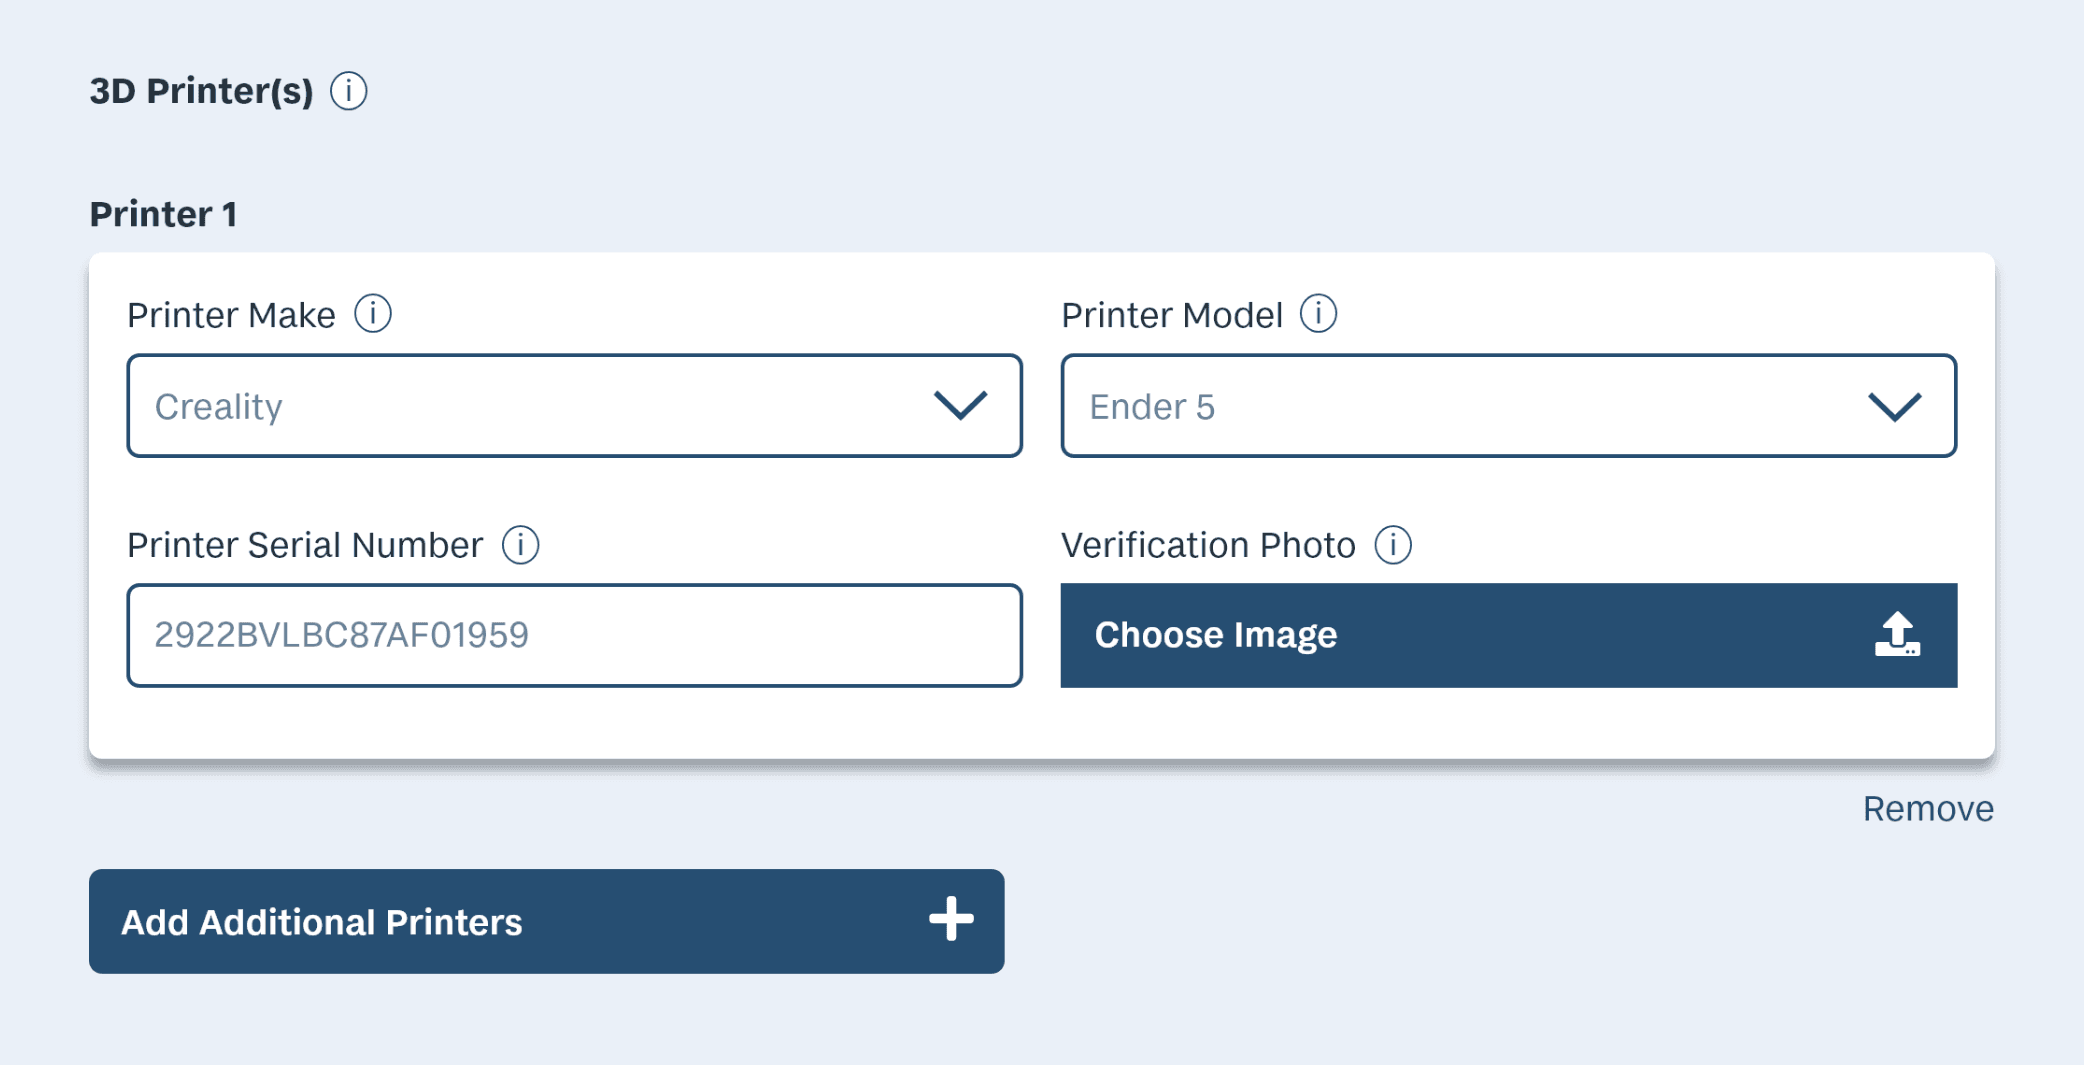
Redesign to match filament inputs, now with support for multiple printers, and integrated support via tooltips.
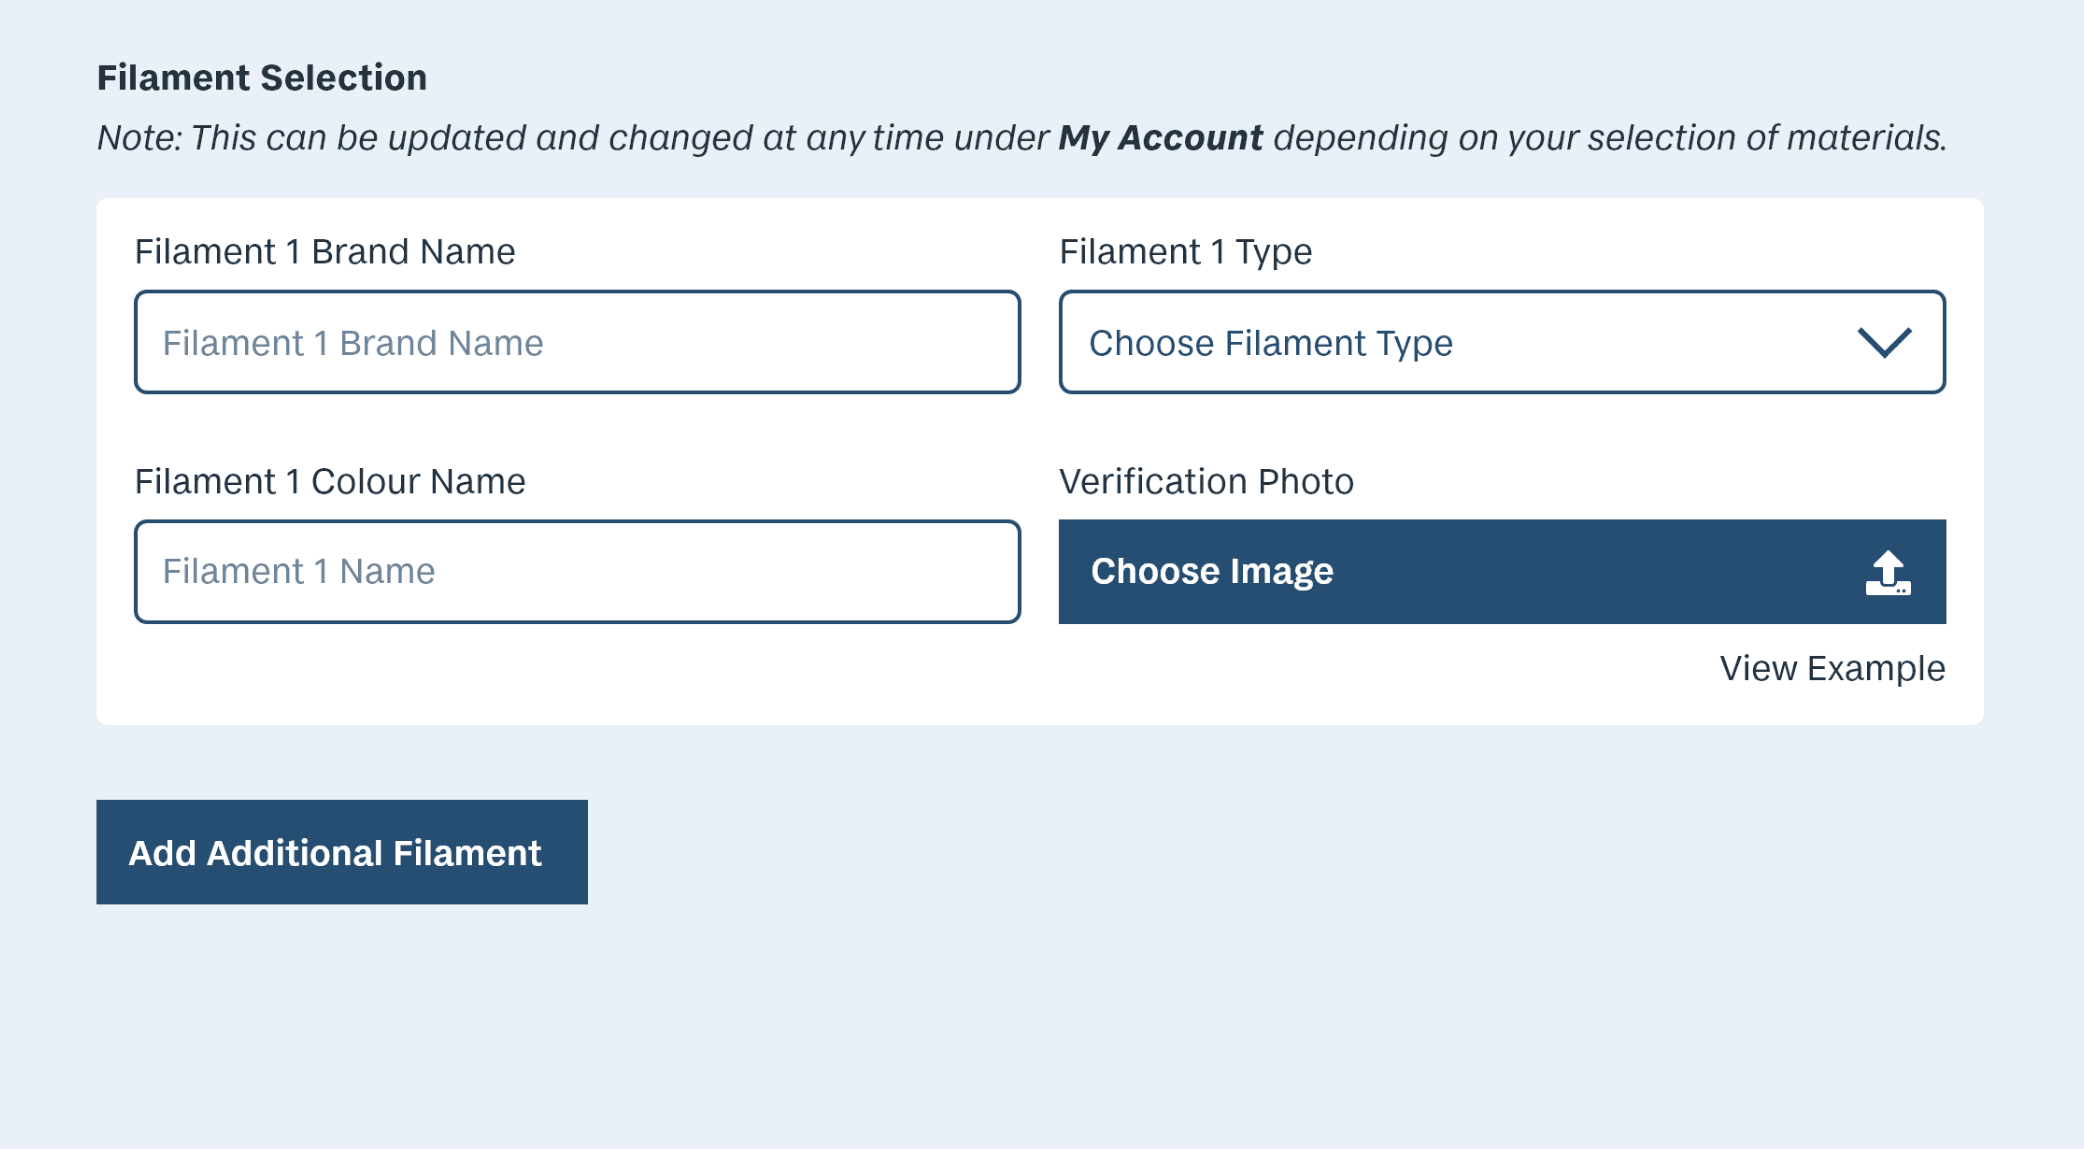
Makers may have entire shelves of filament, so it would be useful to have more distinction between each added material.
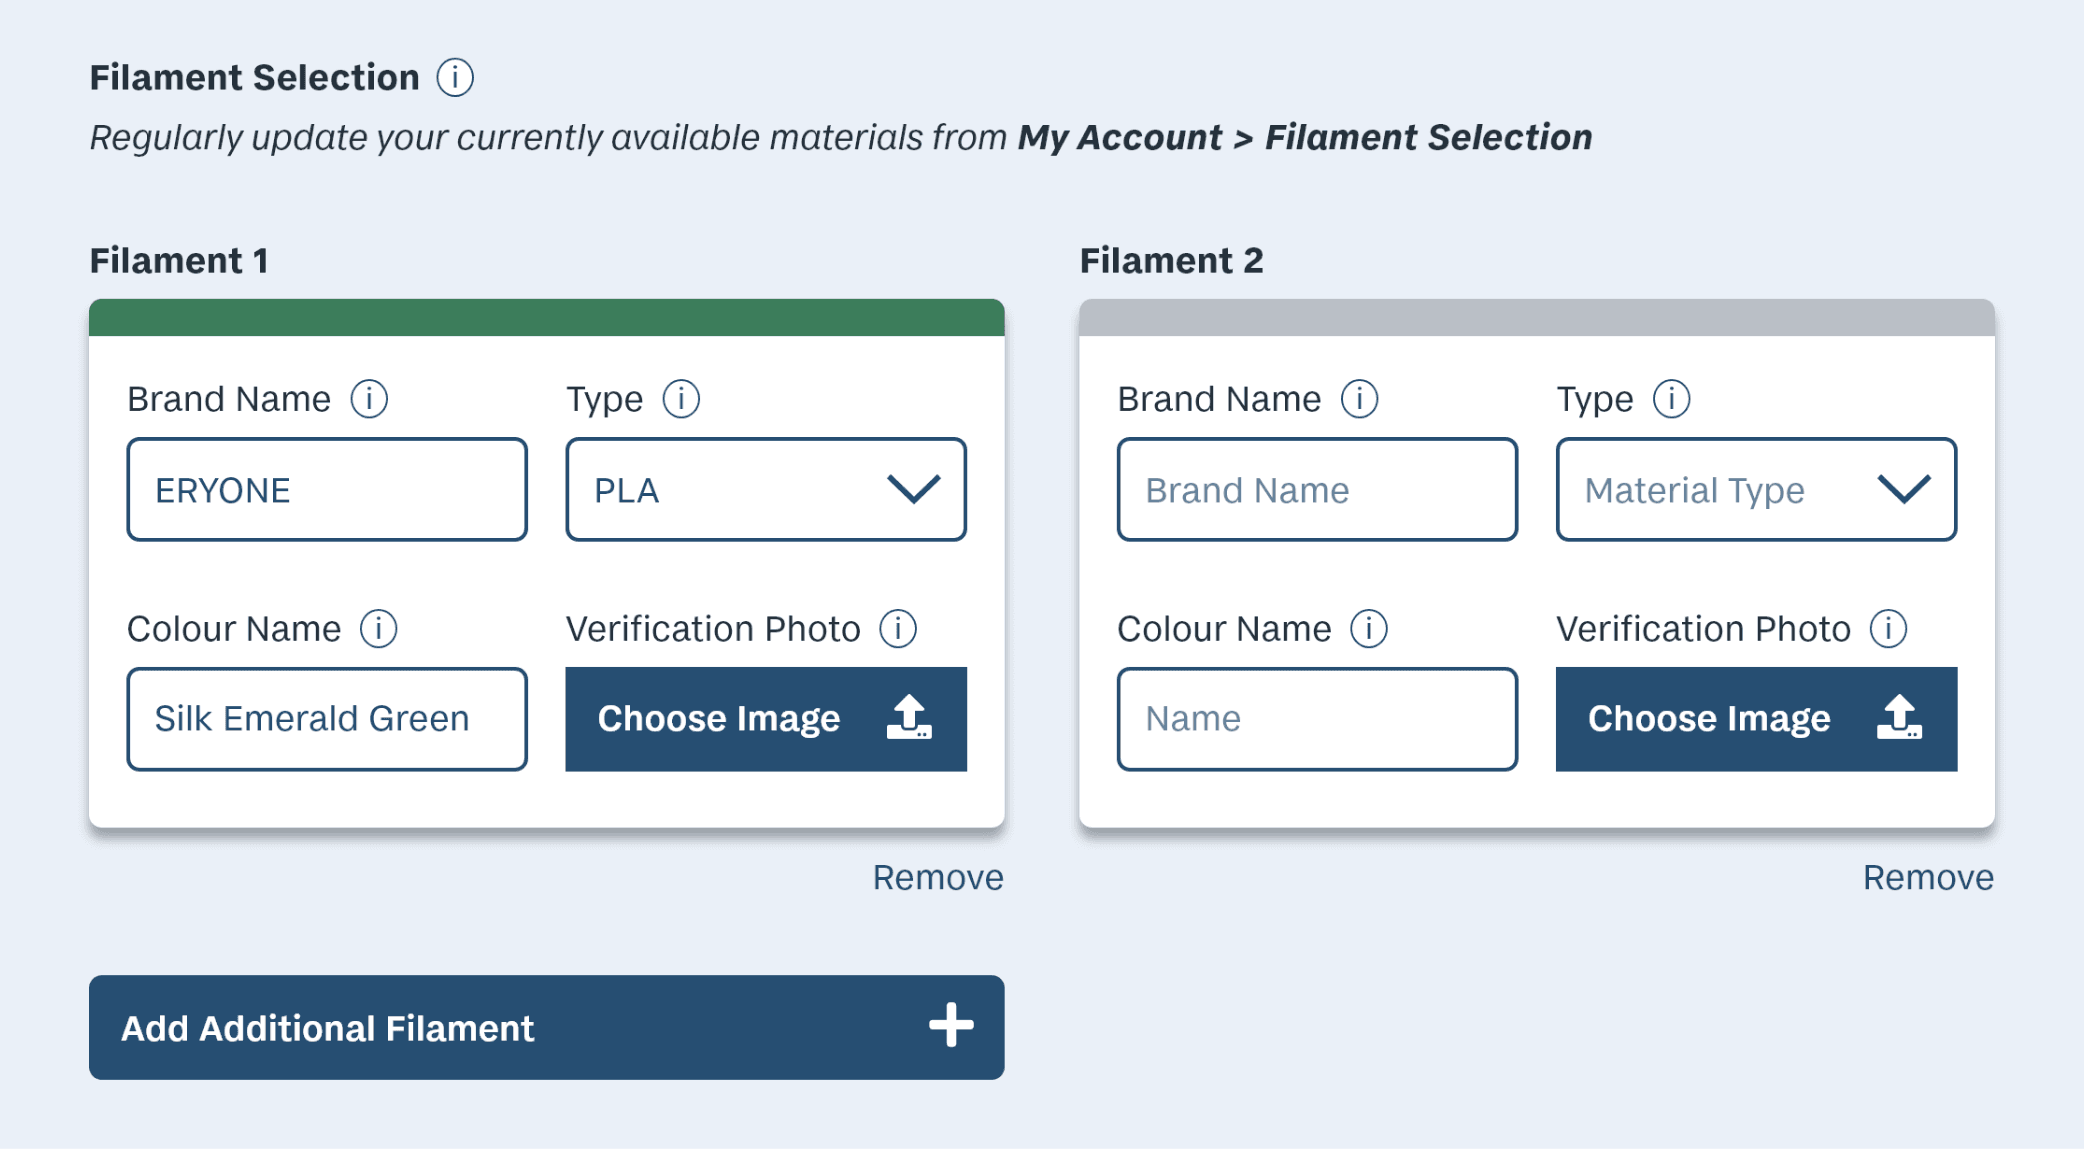
A stripe across the top of the cards match the real-world color of the inputted filament; making them much easier to differentiate.
Tutorial system
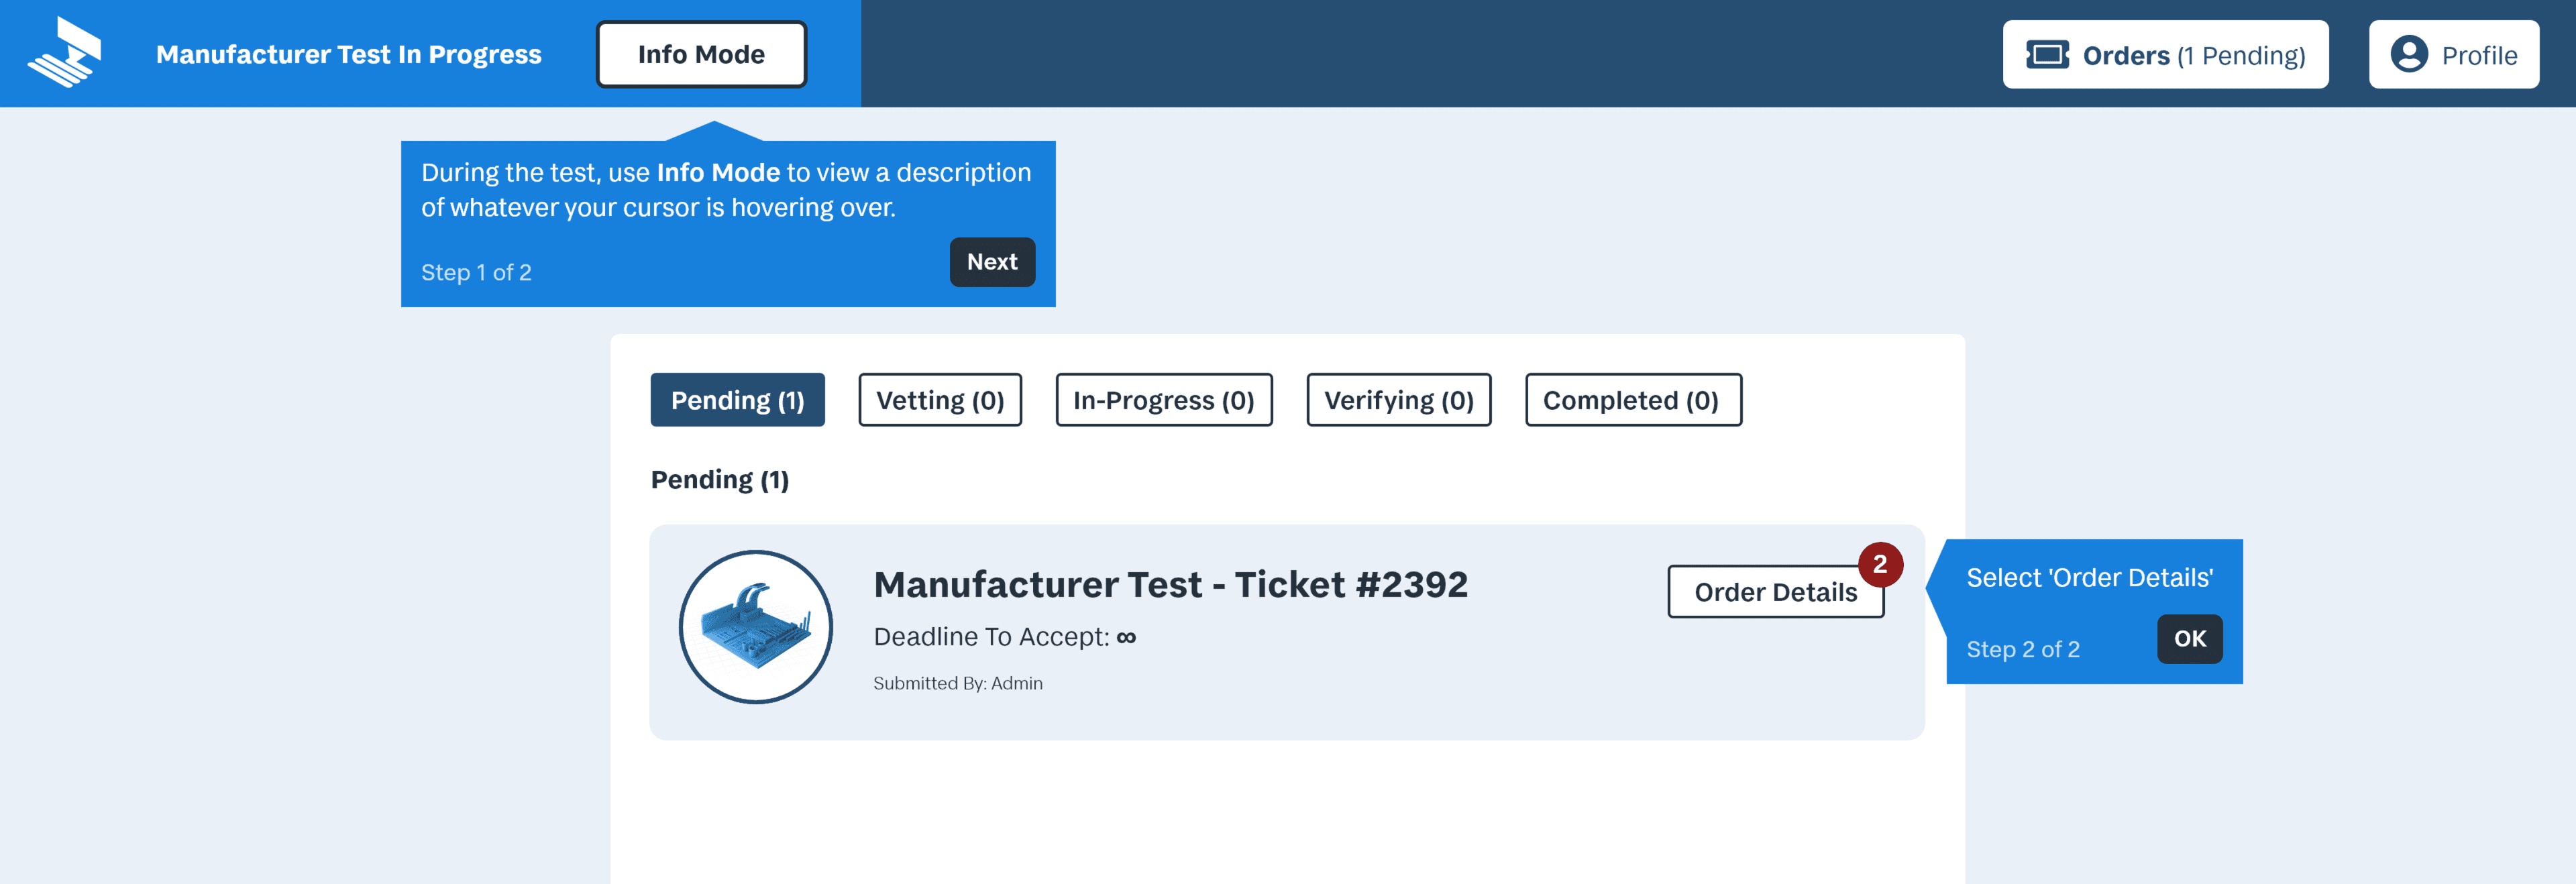
Testers of the Maker journey were navigating much more fluidly halfway through each test. It was taking a few pages of exploration before the terminology, and flow, finally clicked.
To ease the friction of a user’s first order fulfillment, I added an optional tutorial system. Boxes appear one by one describing important elements, and directing the user through their task.
With these and many other issues addressed,
I had actualized the core functionality of the service.

Delivered Project

Login
Getting started - 1/3
Description:
Each user journey begins at Login. Ideally, we will have a welcoming and informative homepage. However, this was not within the project scope.
User Action:
Click log-in or signup

Create account
Getting started - 2/3
Description:
Choose between the two user types, customer and maker.
User Action:
Fill out the provided forms and continue on.
Note:
‘What is a manufacturer?’ text links them to an overview page on being a maker (mocked-up for the project, but is not in this case study).

Onboarding overview
Getting started - 3/3
Description:
Communicate the steps of the onboarding process, and ensure users read the maker Overview page.
User Action:
Click ‘View Overview’ to read the maker overview, then click the checkbox to verify that they have done so before moving forward.
Note:
The maker overview explains critical information about the rules and responsibilities of a maker. Like a ‘Terms of Service’ but more visual, and actually helpful.

Account setup
Account setup - 1/1
Description:
Collect personal details for the user’s account, banking information to pay them for their work, and their weekly availability to determine when they will receive new orders.
User Action:
Fill out the provided forms and continue on.
Note:
Weekly availability UI has been filled to demonstrate the function of the section.

Verify self & equipment
Verification - 1/3
Description:
Submit proof of ownership for their equipment and supplies. This ensures that no one is able to sign up under dishonest pretenses.
User Action:
Submit images of valid photo ID, and verification images of their printer(s), available filament(s), and any relevant additional equipment.
Note:
These details allow us to assign Makers based on the requirements of a job. This gives customers the ability to select the quality of the machine, the print material and colour, and other printer features required to print certain forms.

Verify email
Verification - 2/3
Description:
Ensure that users have verified their email.
User Action:
Check their email for a verification code, resend the email if necessary, enter the code, and begin the test.
Note:
Users need to verify their email to receive the results of the onboarding process. Therefore, this step is a brief yet necessary interruption to avoid upset Makers who weren’t able to receive their test results.

Email verified
Verification - 3/3
Description:
Brief user feedback screen before moving forward.

Test start
Maker test start - 1/3
Description:
A reminder of what will be expected, alongside the first instruction of the test.
User Action:
Click the ‘Orders’ button in the navbar.
Note:
The following test teaches users the order completion process by walking them through a mock order. The resulting printed object is then reviewed to gauge the user’s 3D printing skills. Thereby feeding 2 birds with 1 seed.

Orders (awaiting acceptance)
Maker test start - 2/3
Description:
A complete list of their past and present job orders.
User Action:
Select ‘Order Details’
Note:
Users are reminded with the heading on the top left of the screen that all of the following process is a part of the test. The maker test also includes an ‘Info Mode’ mentioned in the top left to provide optional tutorials throughout the process.

Order details
Maker test start - 3/3
Description:
Provide the details of particular job order: the user’s chosen specifications, object info, a preview of the model, order timeline, and additional comments left by your customer.
User Action:
Accept or reject their incoming order.
Note:
Users can accept the order at any time, however, once accepted they have 24hrs to complete the vetting process. This allows for some flexibility as to when to begin the practical test. In a real order, they would have 2hrs to accept or reject a new job.

Order details (Info Mode)
Maker test start - 3/3
Description:
Identical to the last screen, except with tutorials enabled via the 'Info Mode' toggle. Once enabled, tooltips appear one by one to walk the user through the manufacturer test. This is enabled by default during the test, but can be disabled by the user at any time.
'Info Mode' was created to ensure that makers face as little friction as possible in completing their first job.
Otherwise, the purpose of this page is the same as the last: provide the details of particular job order: the user’s chosen specifications, object info, a preview of the model, order timeline, and additional comments left by your customer.
User Actions:
- Click through the provided tutorials
- Accept or reject their incoming order.
Note:
Users can accept the order at any time, however, once accepted they have 24hrs to complete the vetting process. This allows for some flexibility as to when to begin the practical test. In a real order, they would have 2hrs to accept or reject a new job.

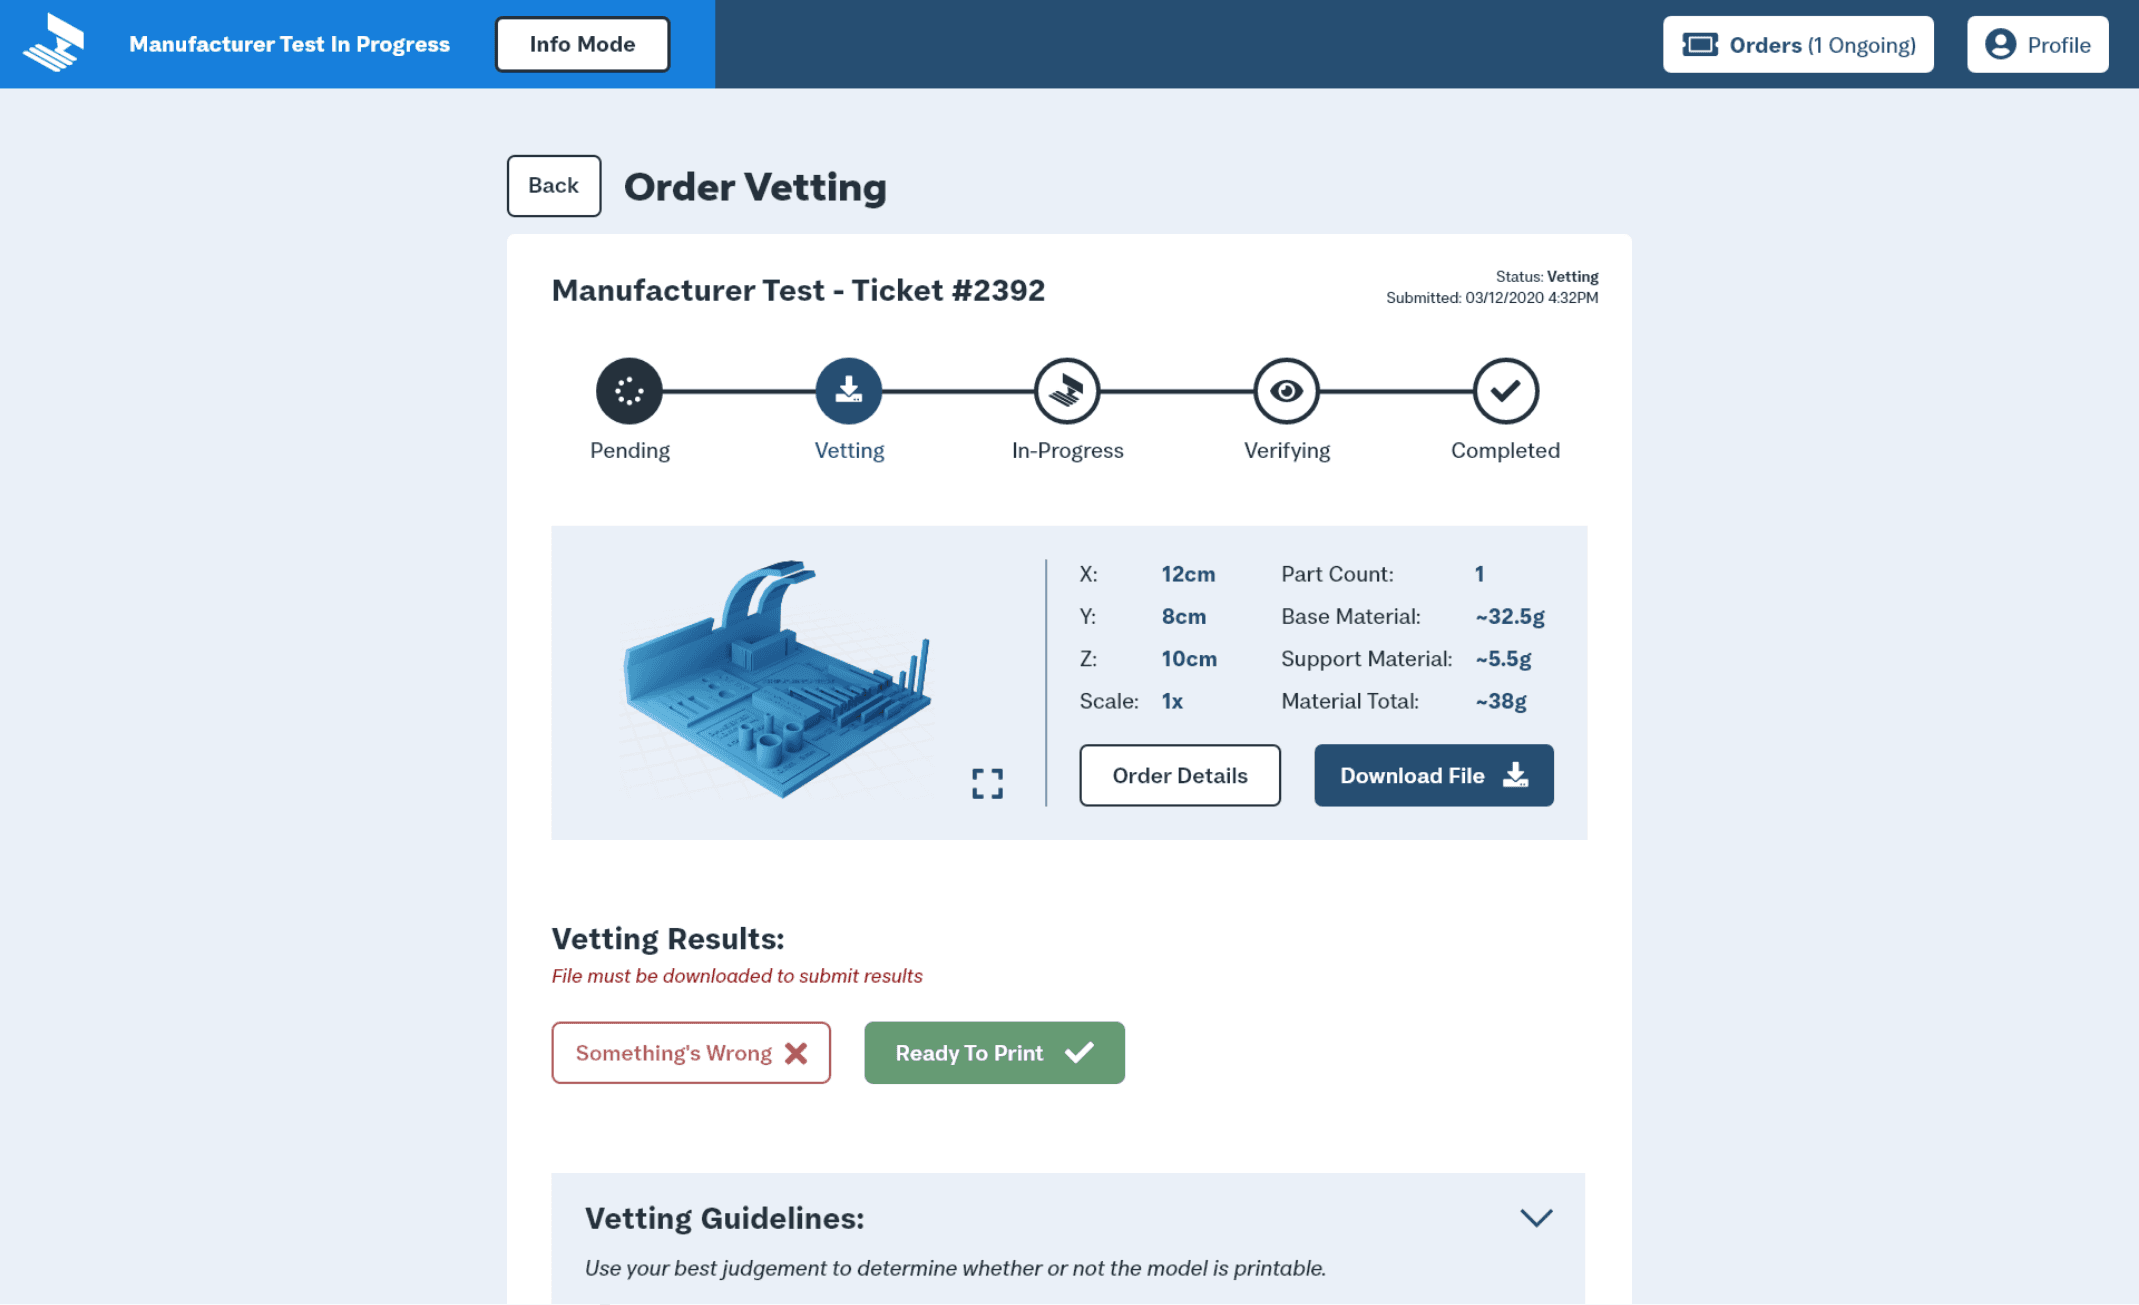
Orders (awaiting vetting)
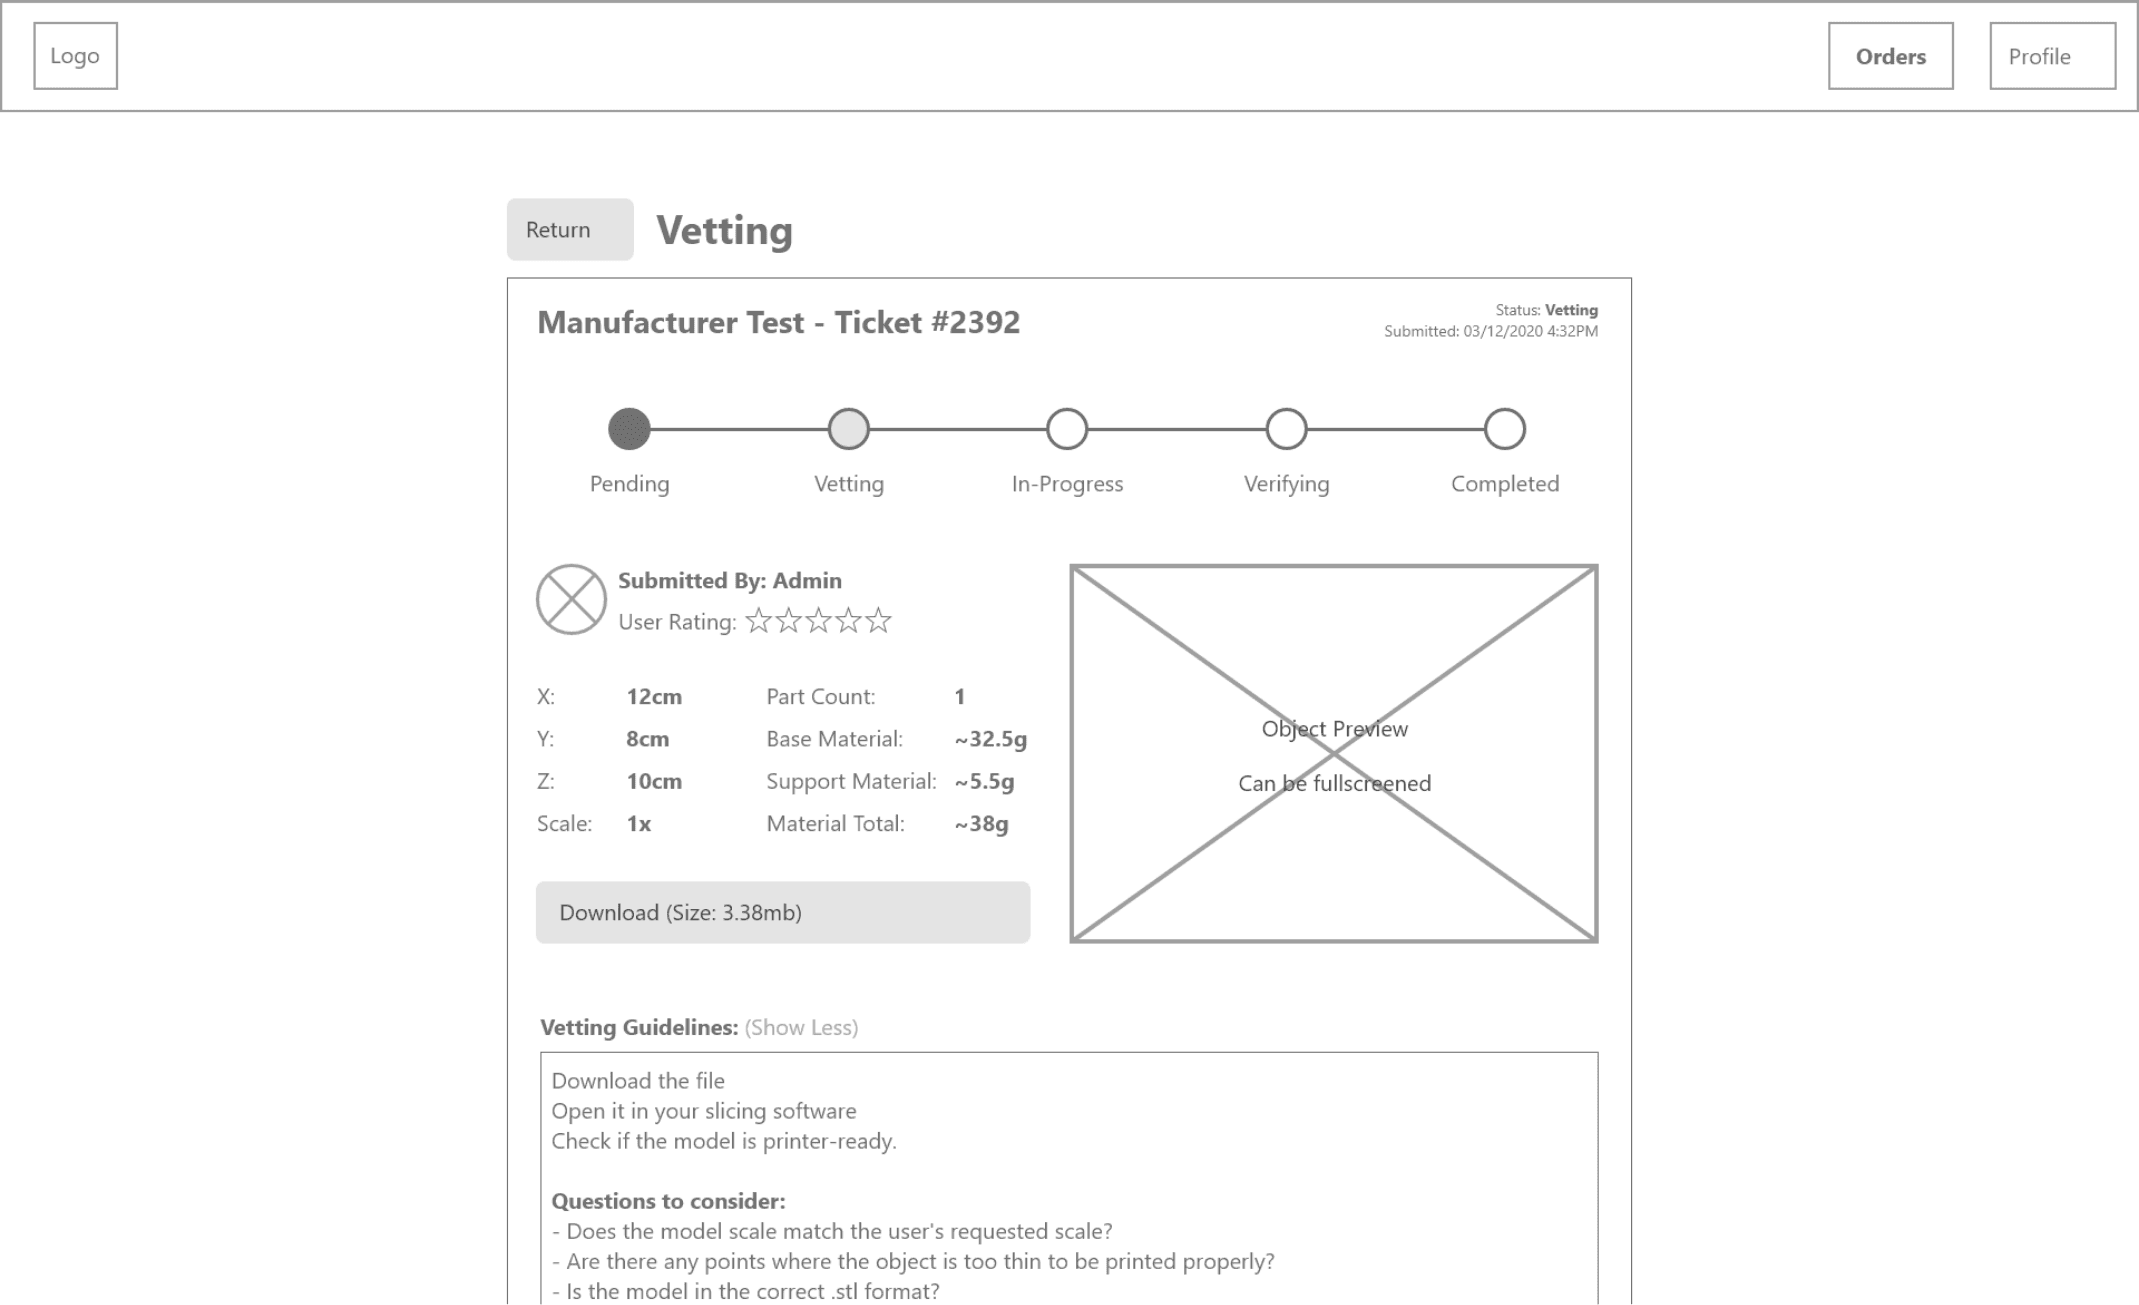
File vetting - 1/2
Description:
Preview the deadline to vet the file, and click the button to perform the next step of the process.

File vetting
File vetting - 2/2
Description:
Allow the user to download the file, and check to ensure that it is able to be printed via slicing software. This ensures makers are never expected to print a file that cannot be printed, and that they never have to modify models.
User Actions:
- Review the steps and guidelines if needed, download the attached file, open it in their slicing software, and assess
- Select the result of their vetting process, and submit.

Orders (ready to submit)
Submit print - 1/2
Description:
Time to begin printing when ready. The maker already downloaded the file during the vetting stage and prepared it in slicing software. Meaning, they will be ready to get started with the print as soon as they can.
User Action:
Complete the order print, return to this page, and click ‘Submit Print’

Print verification
Submit print - 2/2
Description:
Submit 4 images of the printed object to the customer. This gives the customer peace of mind that the print was totally successful, or the opportunity to intervene and request a reprint if something looks wrong.
User Action:
Capture and submit each required image, and click ‘Submit’.

Orders (print submitted)
Job/Test complete - 1/3
Description:
Remind the maker that their order has been submitted, and it’s time to wait for the customer’s response. Ensuring the customer is satisfied and won't be surprised by the product that arrives on their doorstep.
User Action:
Wait for the customer’s approval, prepare to ship the object if they want to, and view their submission if they want to double-check what they’ve delivered.

Orders (job completed)
Job/Test complete - 2/3
Description:
A completed job ticket. In the case of the maker test, they are about to review their results, marking the end of the process.
User Action:
Click ‘View Feedback’ to review the results of their test. Outside of the test, this would allow them to see whether or not the user has verified their print. If they did, it would then be time to mail the object.
Note:
If they’ve passed, all that’s left is to complete a short video call, much like an Uber driver’s last onboarding step would be an in-person inspection of themselves and their vehicle.

Customer feedback
Job/Test complete - 3/3
Description:
Allows the maker to review the customer’s response to their submitted images. They can see the rating and feedback provided by the customer, much like an Uber driver receives a rating after a job.
If the customer accepts and verifies the images then it’s time to mail the object.
If they reject the object, they may have to reprint and correct their mistake.
In the case of the maker test, this page shows their results. If they’ve passed, all that’s left is to complete a short video call, much like an Uber driver’s last onboarding step would be an in-person inspection of themselves and their vehicle.

Login
Getting Started - 1/2
Description:
Ideally, we will have a welcoming and informative homepage, however, this was not within the project scope. Therefore each user journey begins at Login.
User Action:
Click log-in or signup

Create account
Getting Started - 2/2
Description:
Choose between the two user types, customer and maker.
Note:
‘What is a manufacturer?’ text links them to an overview page on being a maker (mocked-up for the project, but is not in this case study).

Account setup
Account setup - 1/3
Description:
Gather the necessary info for a new customer account.

Select Interests
Account setup - 2/3
Description:
The target demographic is users who wouldn’t normally use 3D printing to solve their issues. So, to help them explore the possibilities of the technology, we encourage users to select some personal interests. We then use that info to create a storefront page tailored to their hobbies.
User Action:
Select 3 or more topics, or skip this optional page.

Verify Email
Account setup - 3/3
Description:
Verify the email of the new customer account.
User Action:
Check their email for a verification code, resend the email if necessary, enter the code, and move on. Or, skip for now (purchasing is not possible until the account is verified).

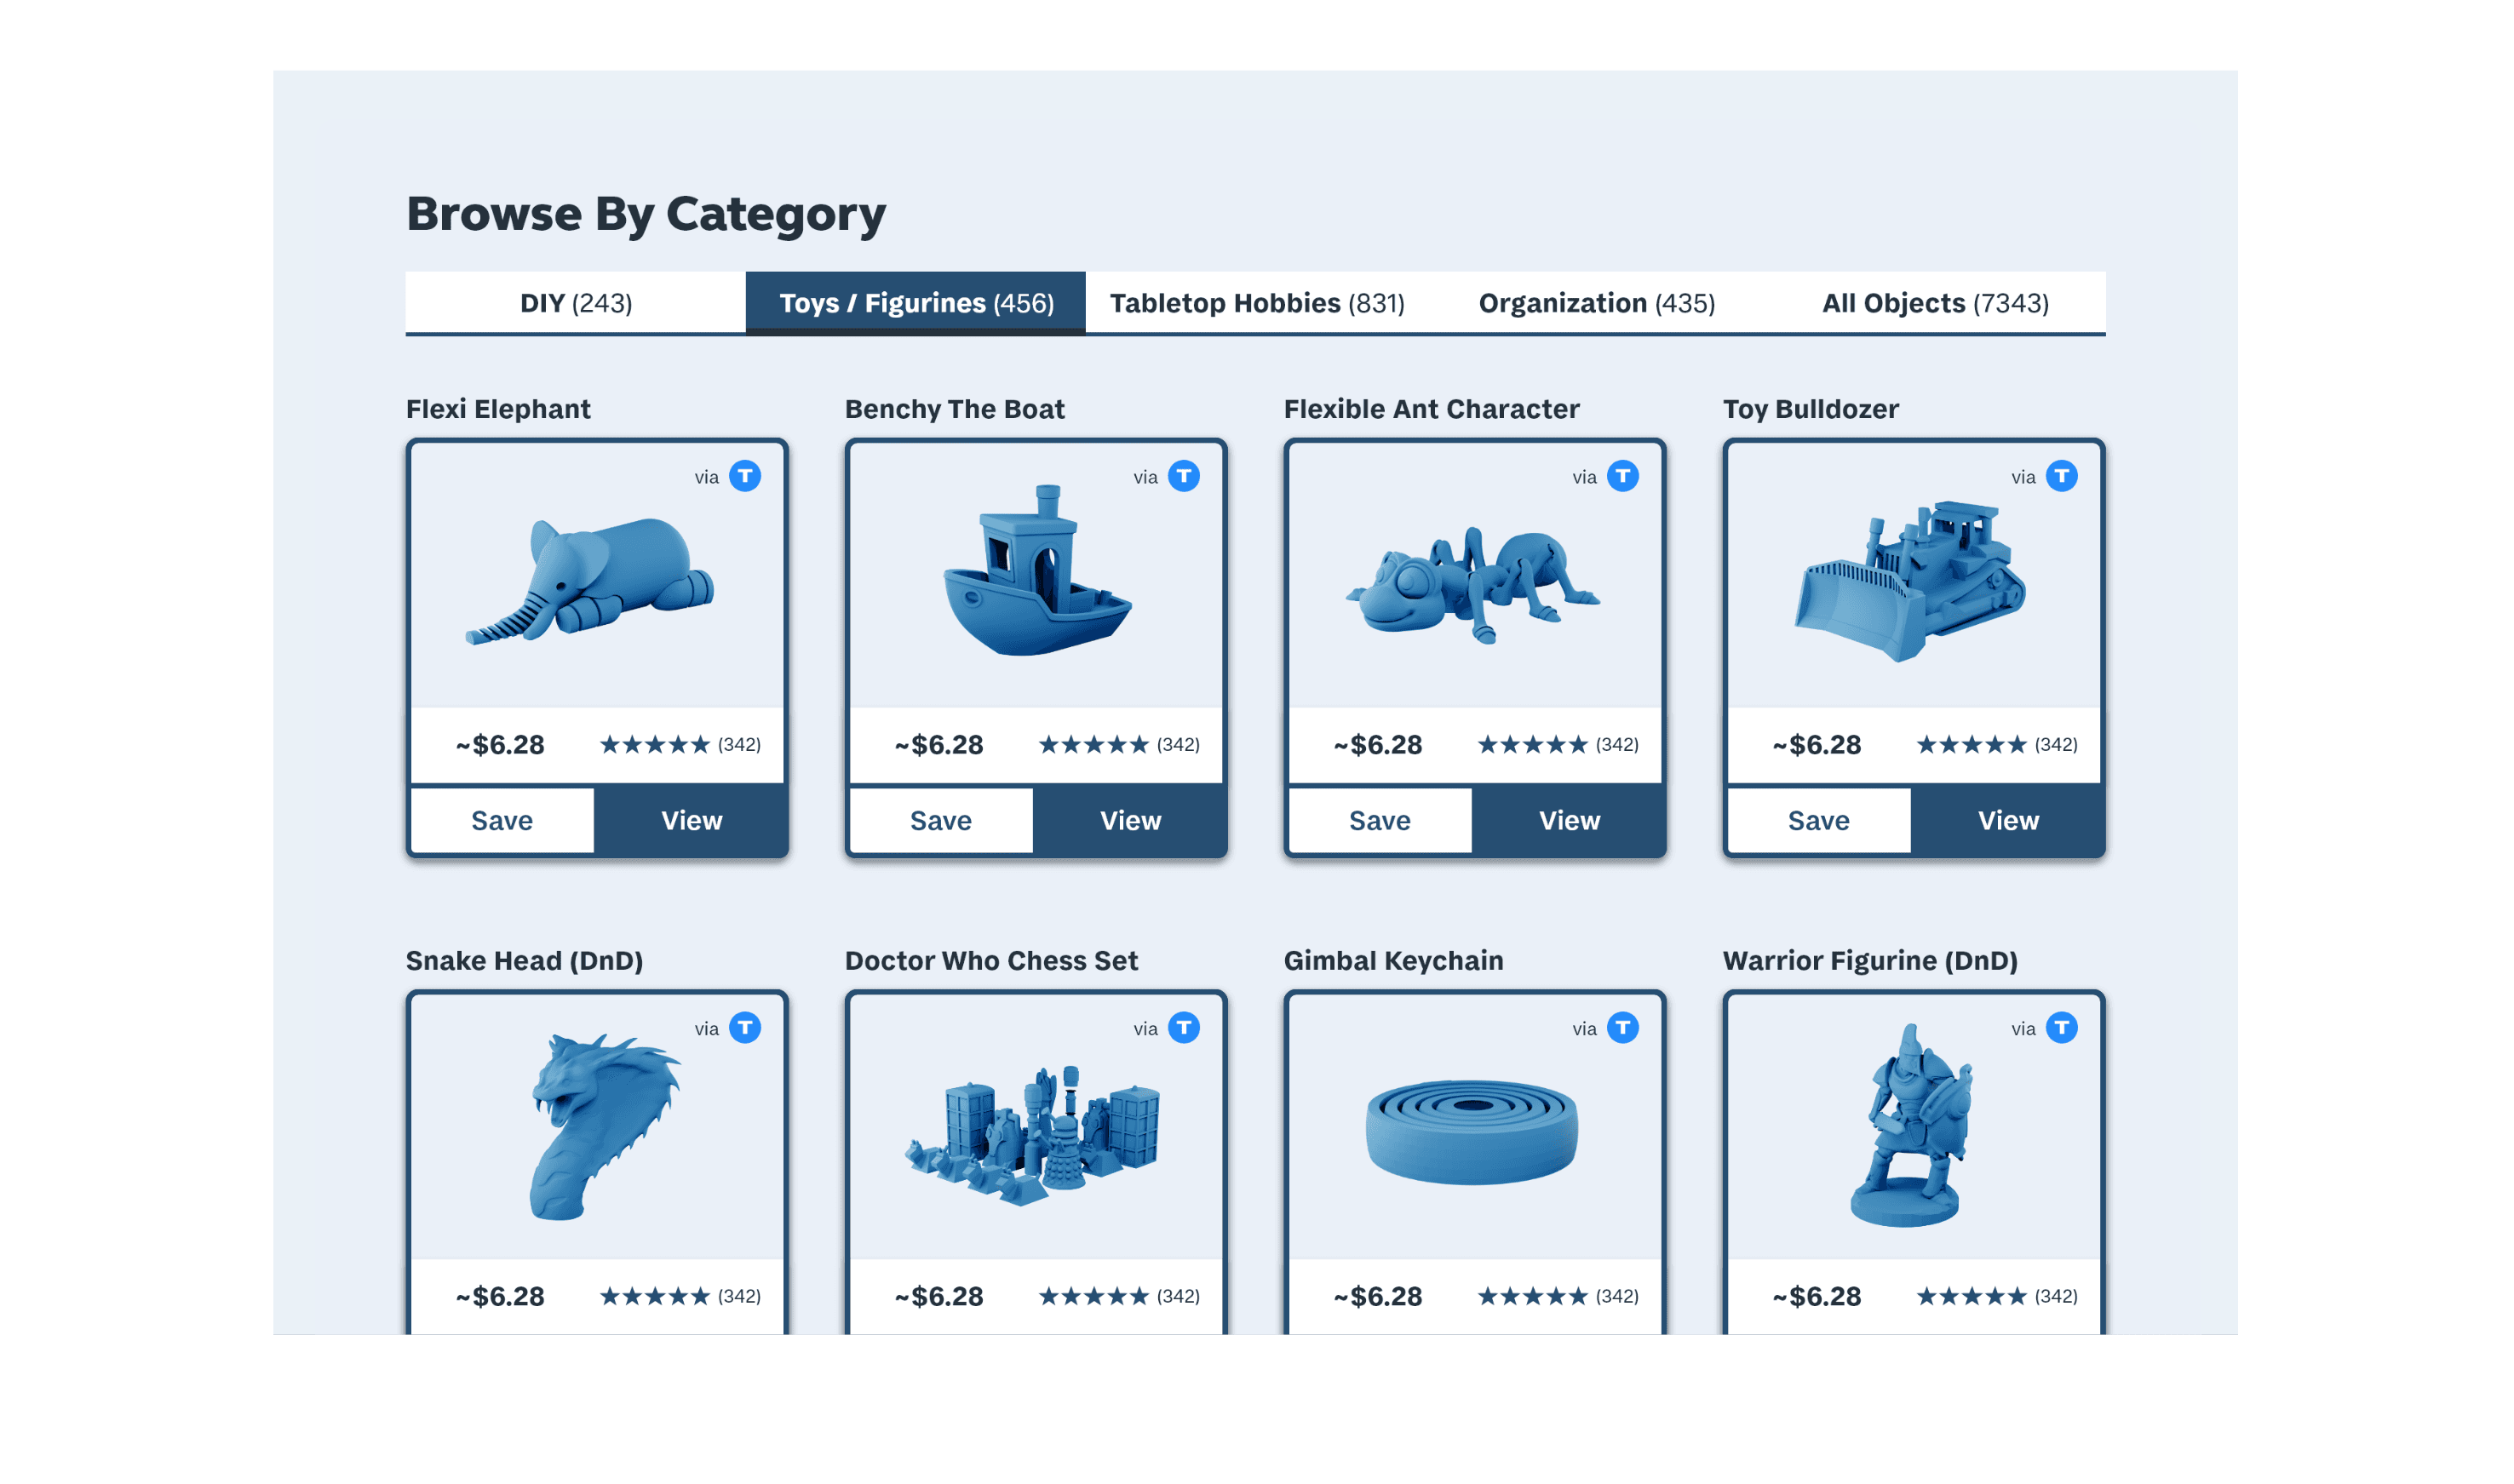
Storefront
Browsing - 1/2
Description:
Acts essentially as the homepage for customers. Encourages a new window-shopping approach to 3D printing for consumers, and enables them to explore the possibilities of the technology.
User Action:
Browse and select items.

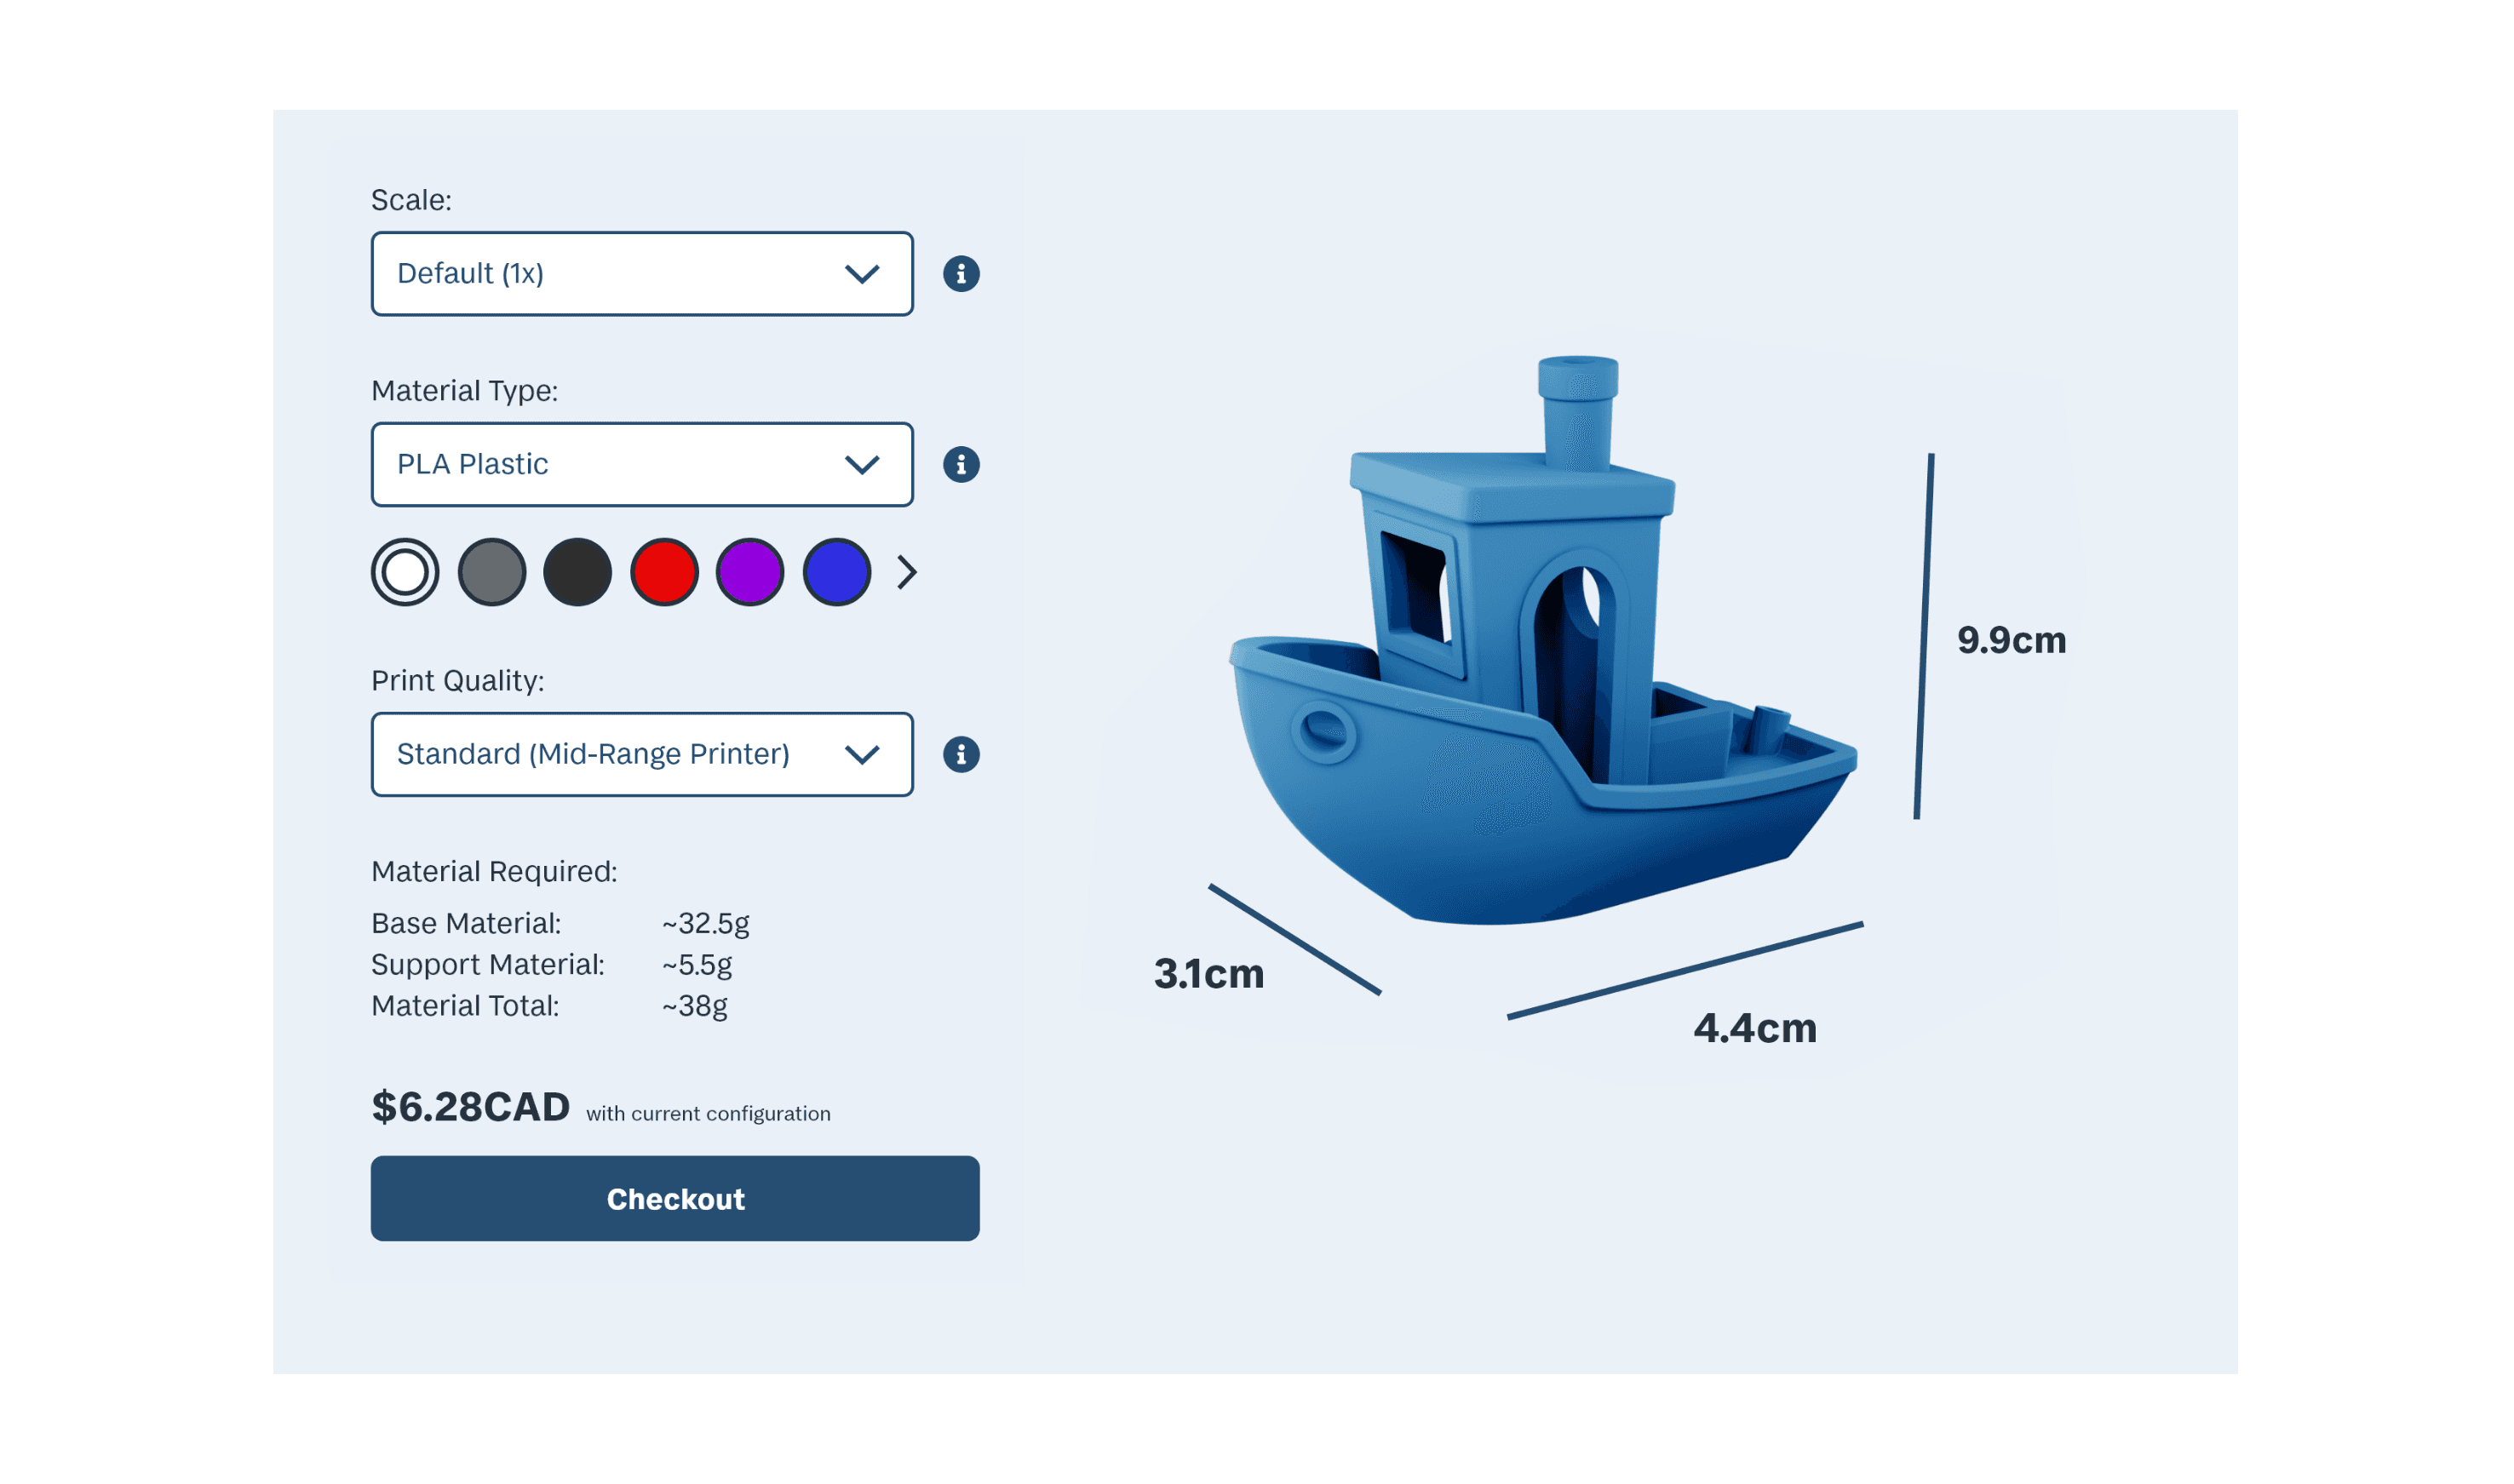
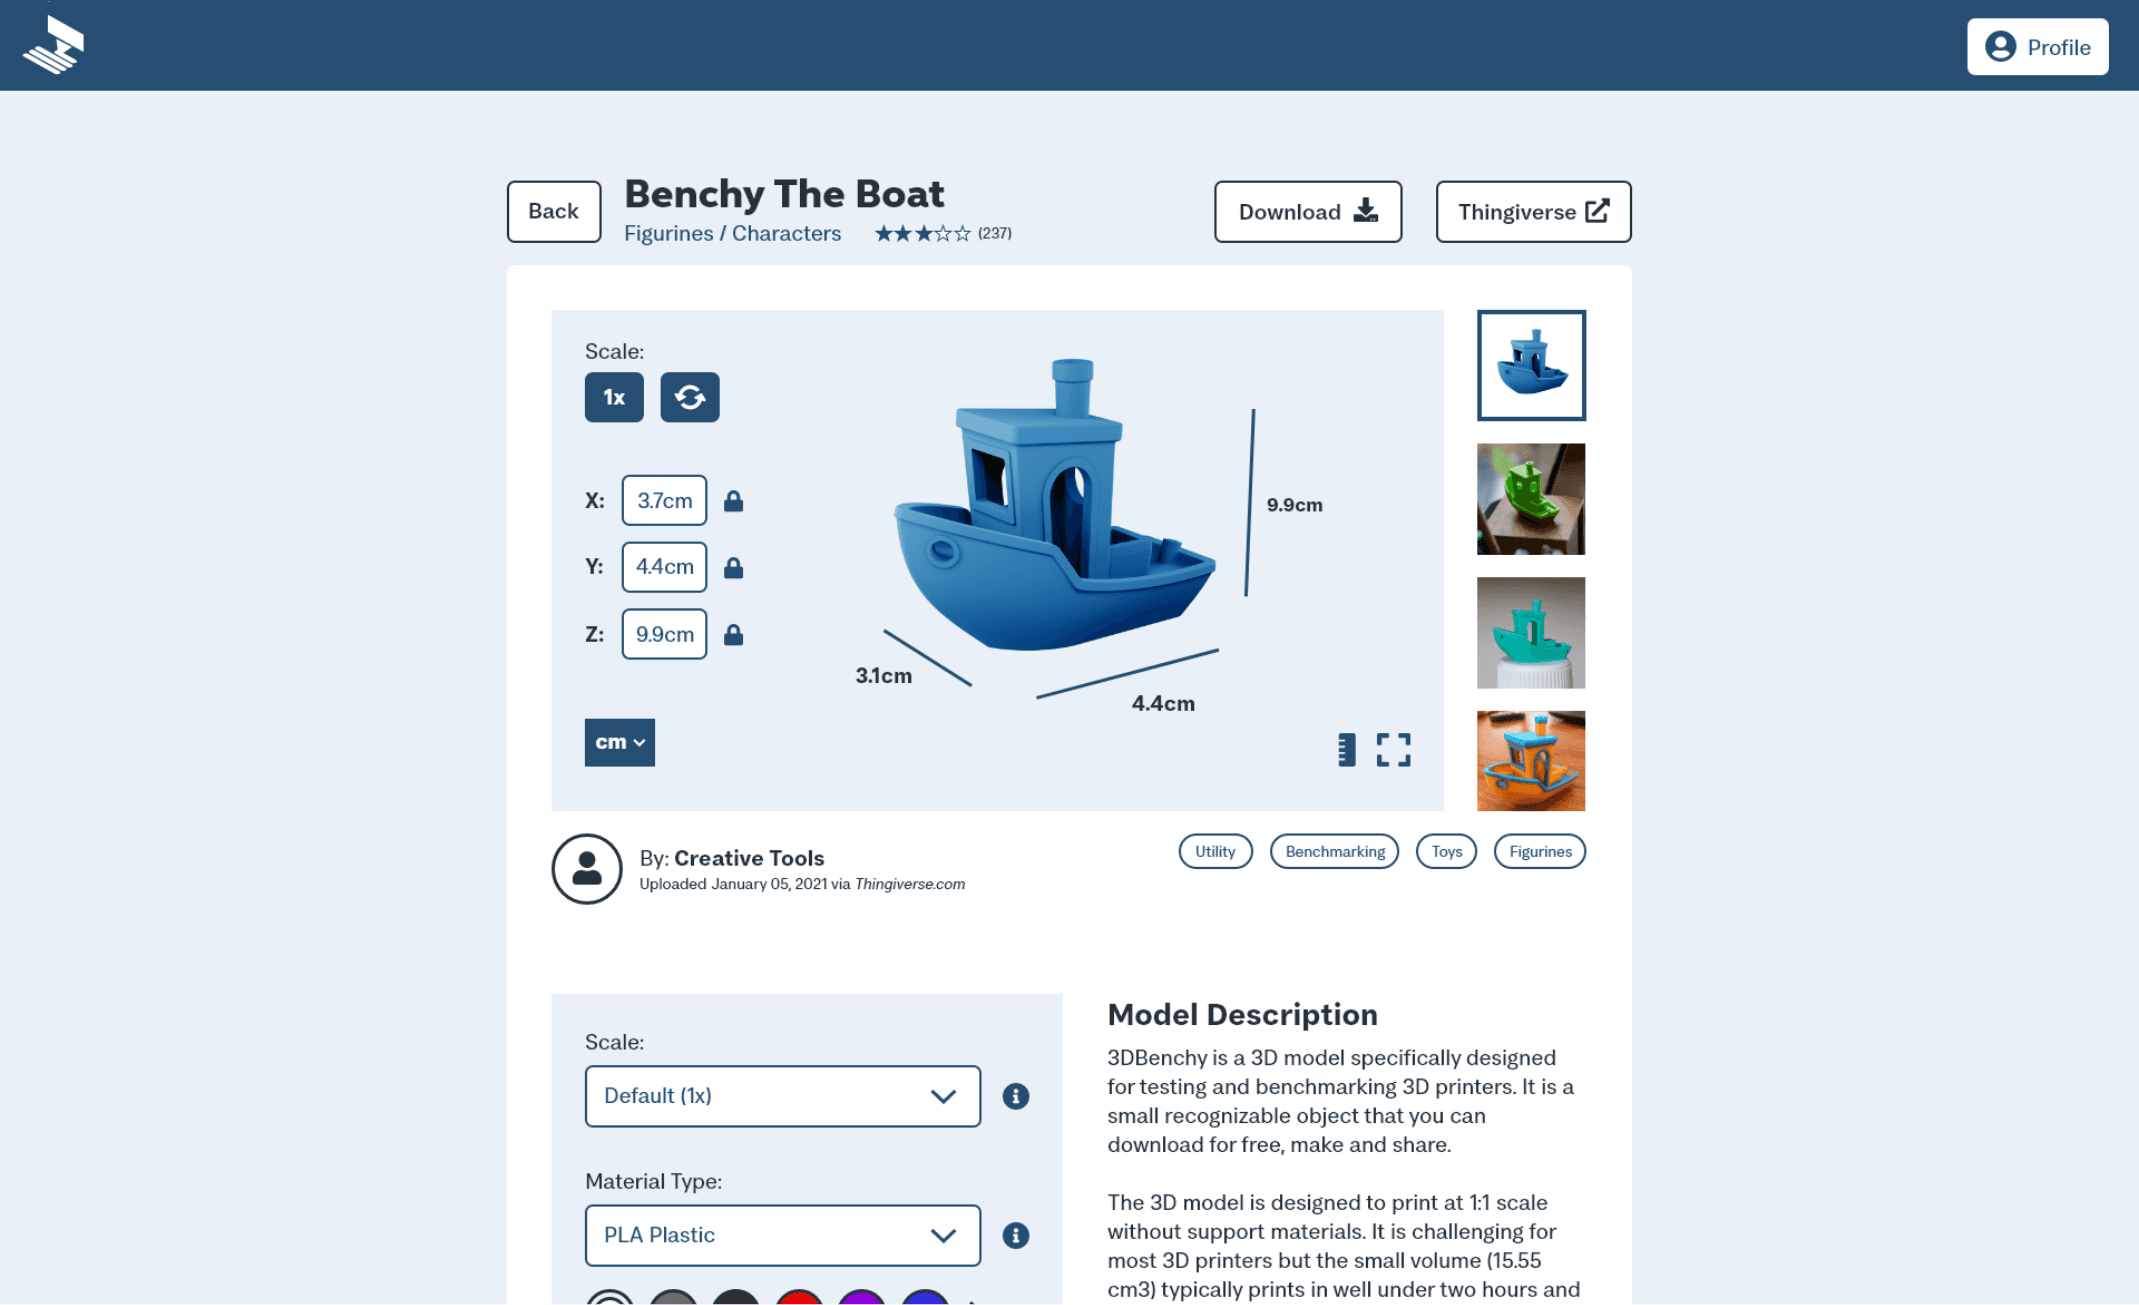
Item listing
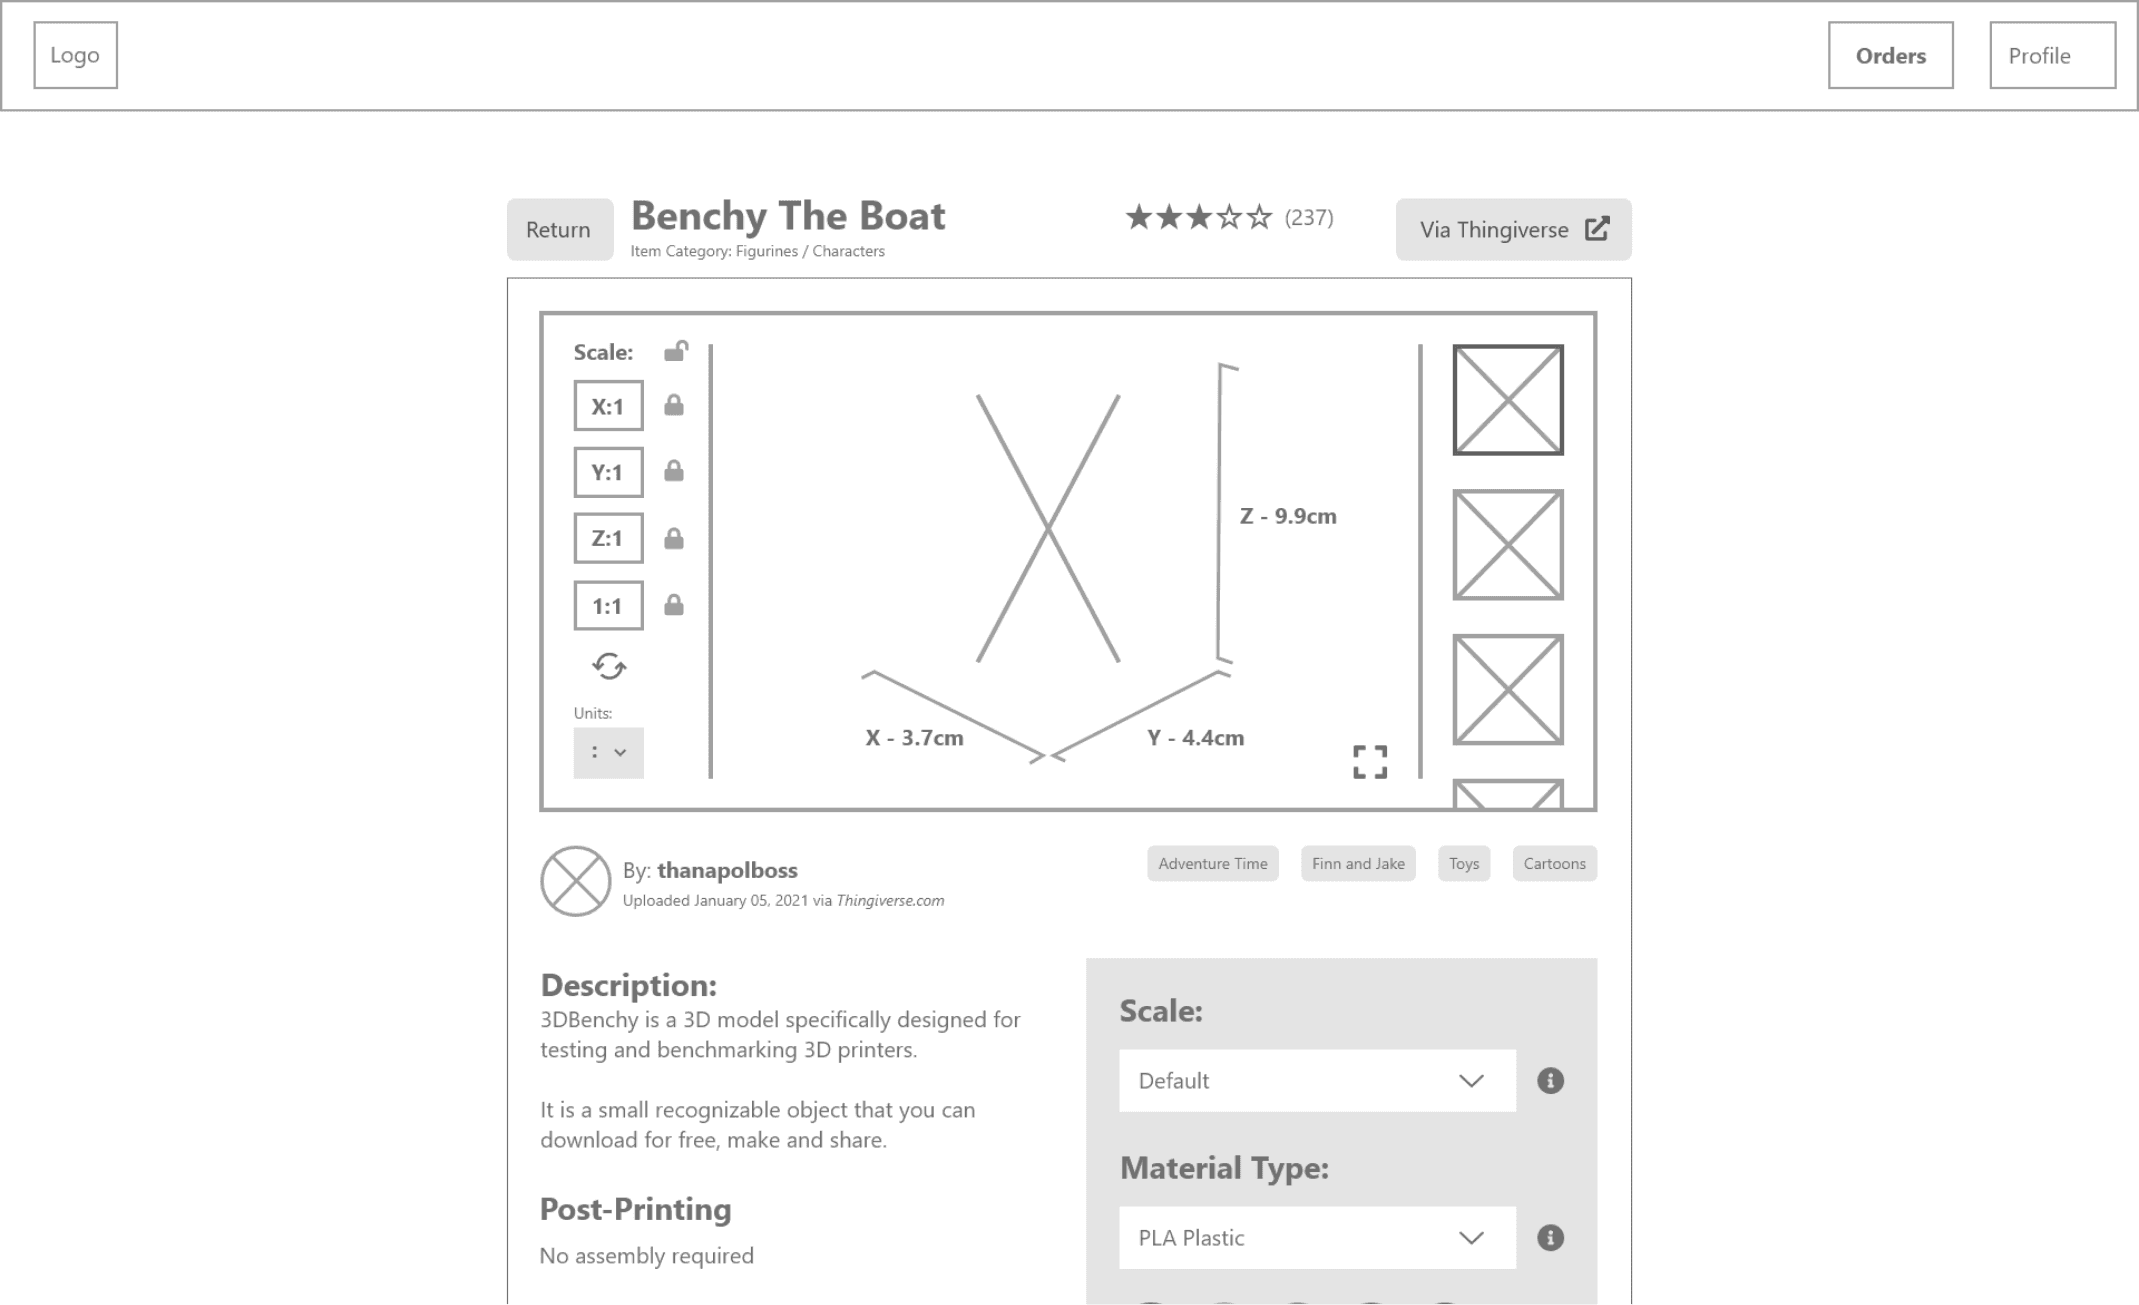
Browsing - 2/2
Description:
The full details of a selected item from the store. Including an interactive 3D model, images of past prints, and comments from other customers.
User Action:
Customize the model’s scale, color, material, and print quality. While simultaneously previewing these changes, and their impact on cost. Customers can then purchase the item and proceed to checkout.

Checkout
Purchasing - 1/2
Description:
Checkout screen from which customers complete their purchase.
User Action:
Customize the model further, add additional comments to the order ticket, and customize the 2 separate timeline options; shipping speed, and production speed. Where production speed changes the priority and deadline of the order for the assigned maker, for an added fee.

Checkout (edit order)
Purchasing - 1/2
Description:
Checkout screen from which customers complete their purchase.
User Action:
Customize the model further, add additional comments to the order ticket, and customize the 2 separate timeline options; shipping speed, and production speed. Where production speed changes the priority and deadline of the order for the assigned maker, for an added fee.

Order placed
Purchasing - 2/2
Description:
Confirmation screen denoting that the order has been placed successfully, and is now pending assignment to one of our makers.
User Action:
Continue browsing, or view your active orders.

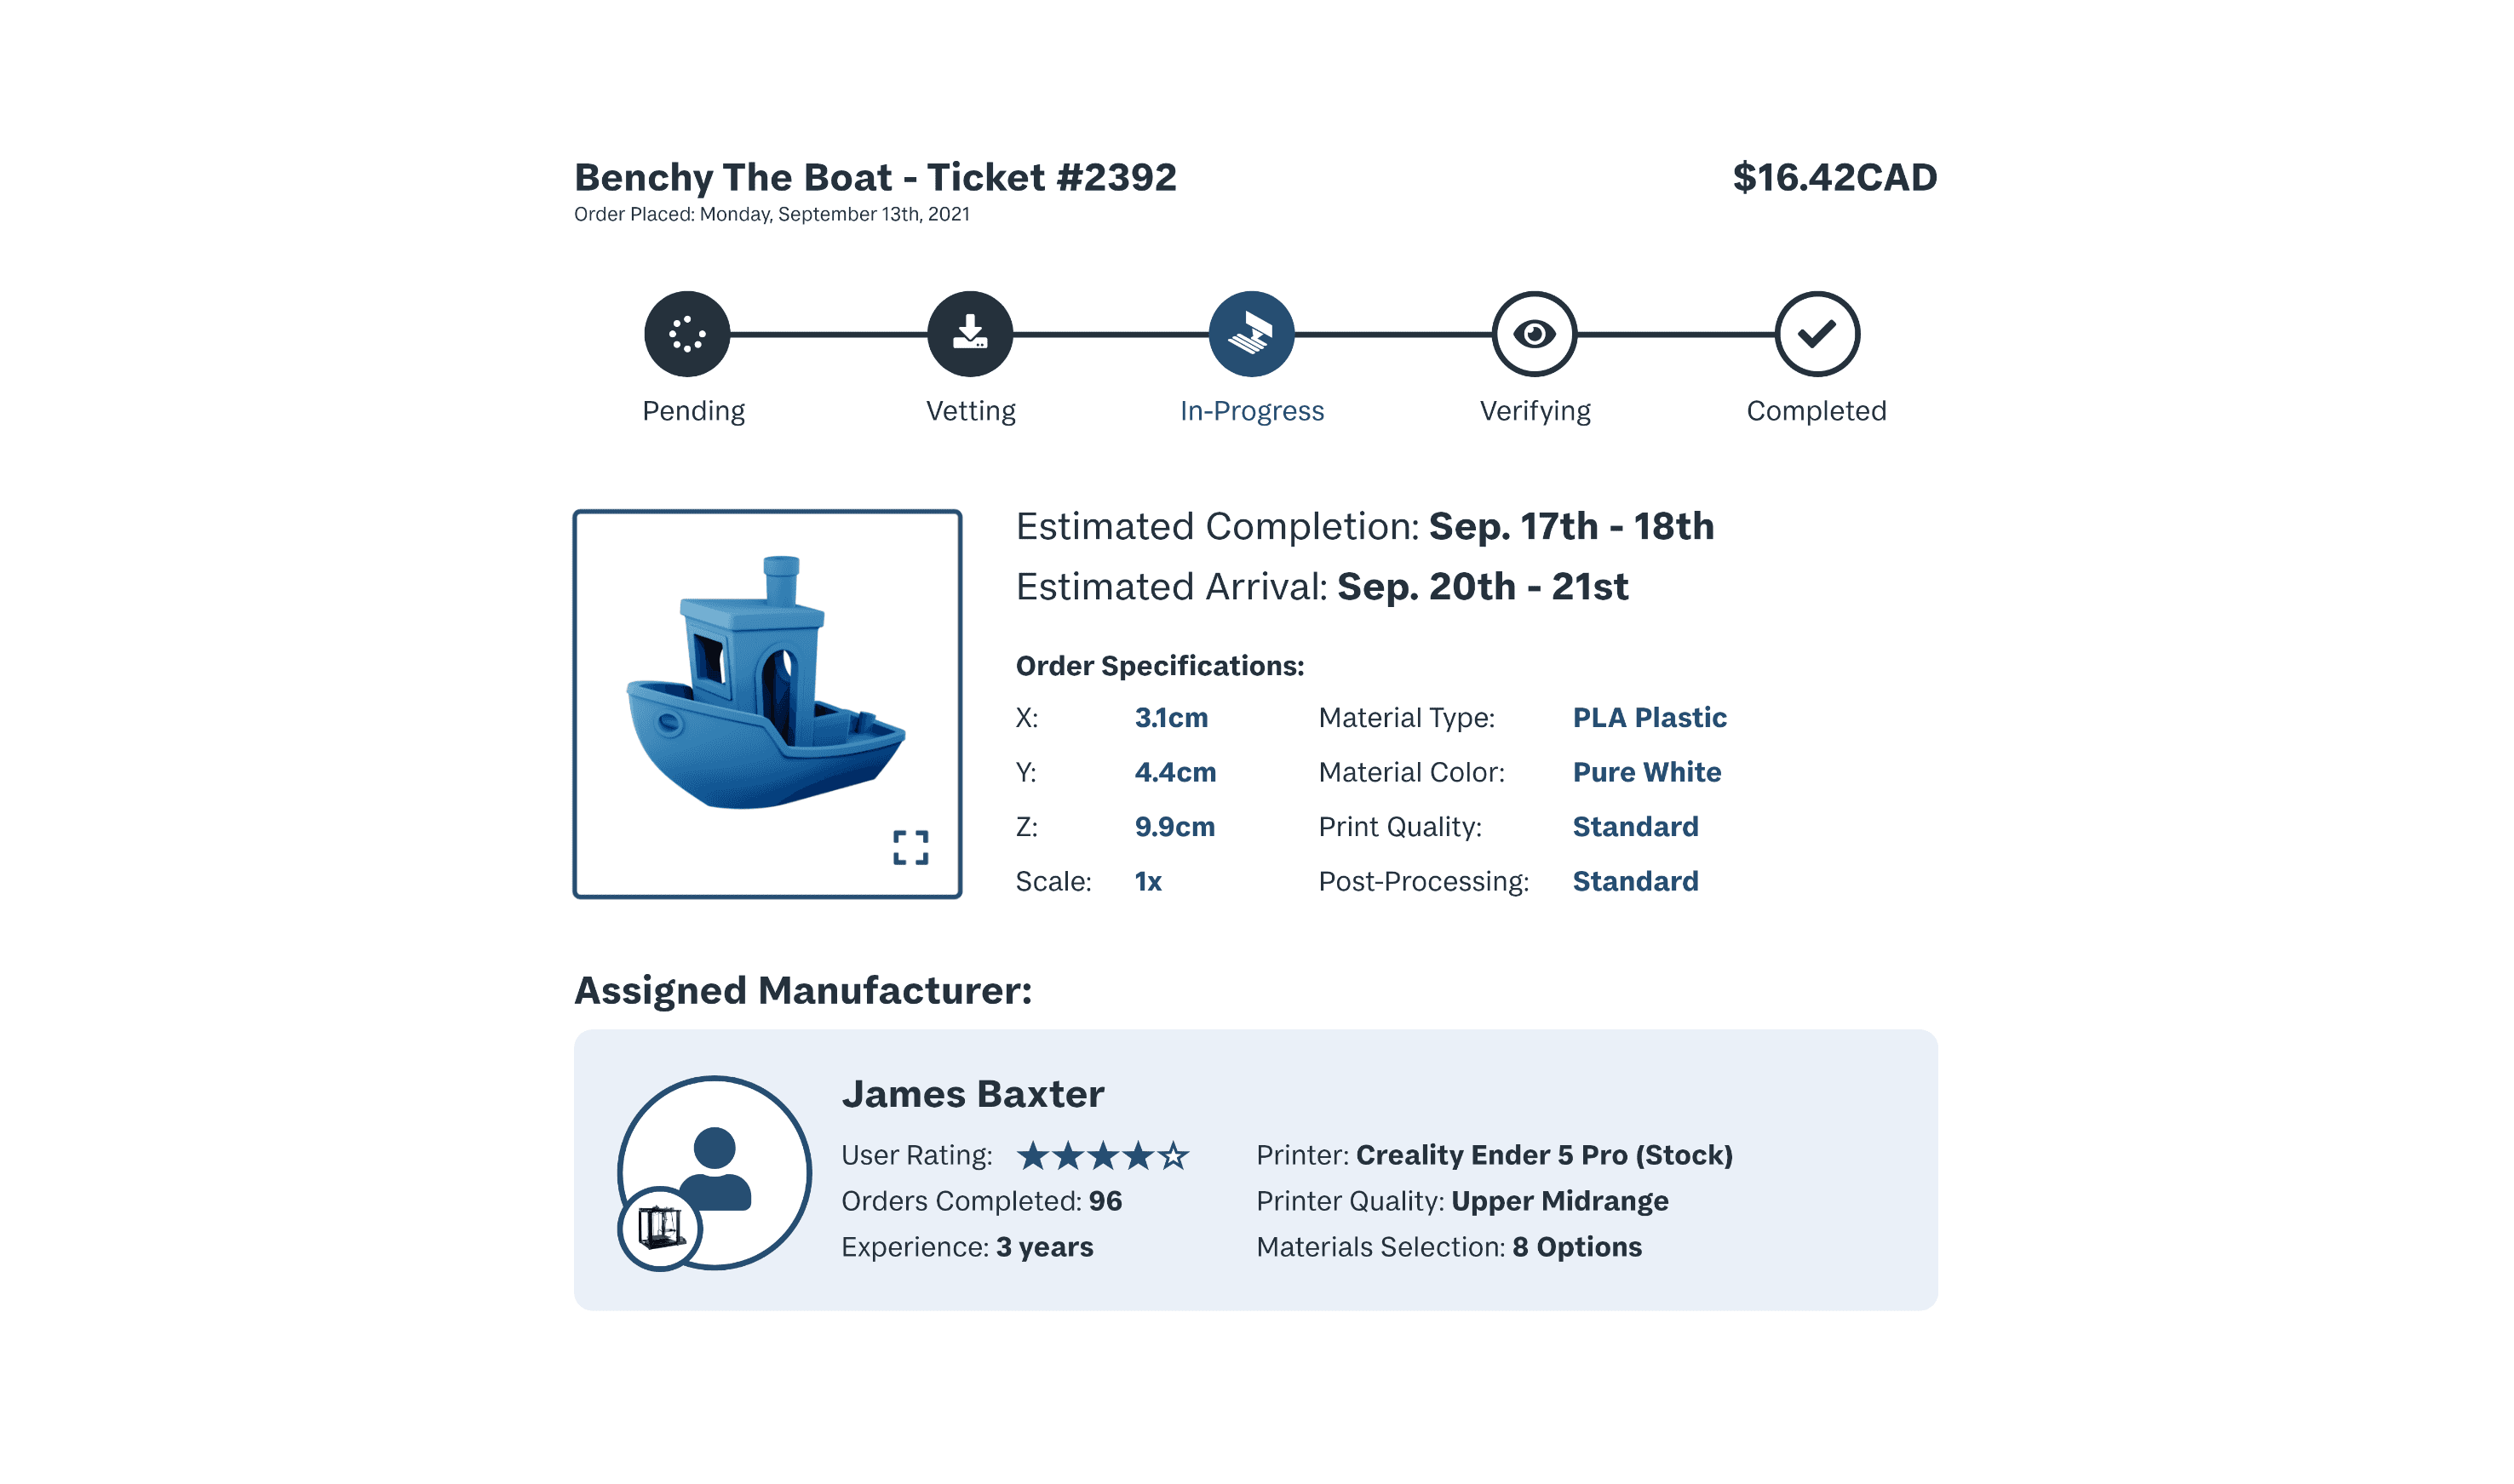
My Orders (pending)
Order in progress - 1/2
Description:
The page where users can view the full list of their ongoing and past orders.
User Action:
Interact with any of their order tickets.

My Orders (accepted / vetting)
Order in progress - 2/2
Description:
A customer’s 'My Orders' page when their ticket has been accepted by a Maker. At this stage, the Maker is currently assessing whether or not the ordered file is ready to be printed.
User Action:
Click on the ticket to visit the order ticket page if they want more info.

Order ticket (accepted / vetting)
Order in progress - 2/2
Description:
The expanded view of an order ticket, i.e. the ticket’s dedicated page. Identical to the previous screen, this shows the appearance of an order ticket that has just been accepted by a Maker if the user were to click on it from the previous My Orders screen.
User Action:
Users can cancel the order, request changes (for a fee), communicate with their maker, and view details on their maker and the order.

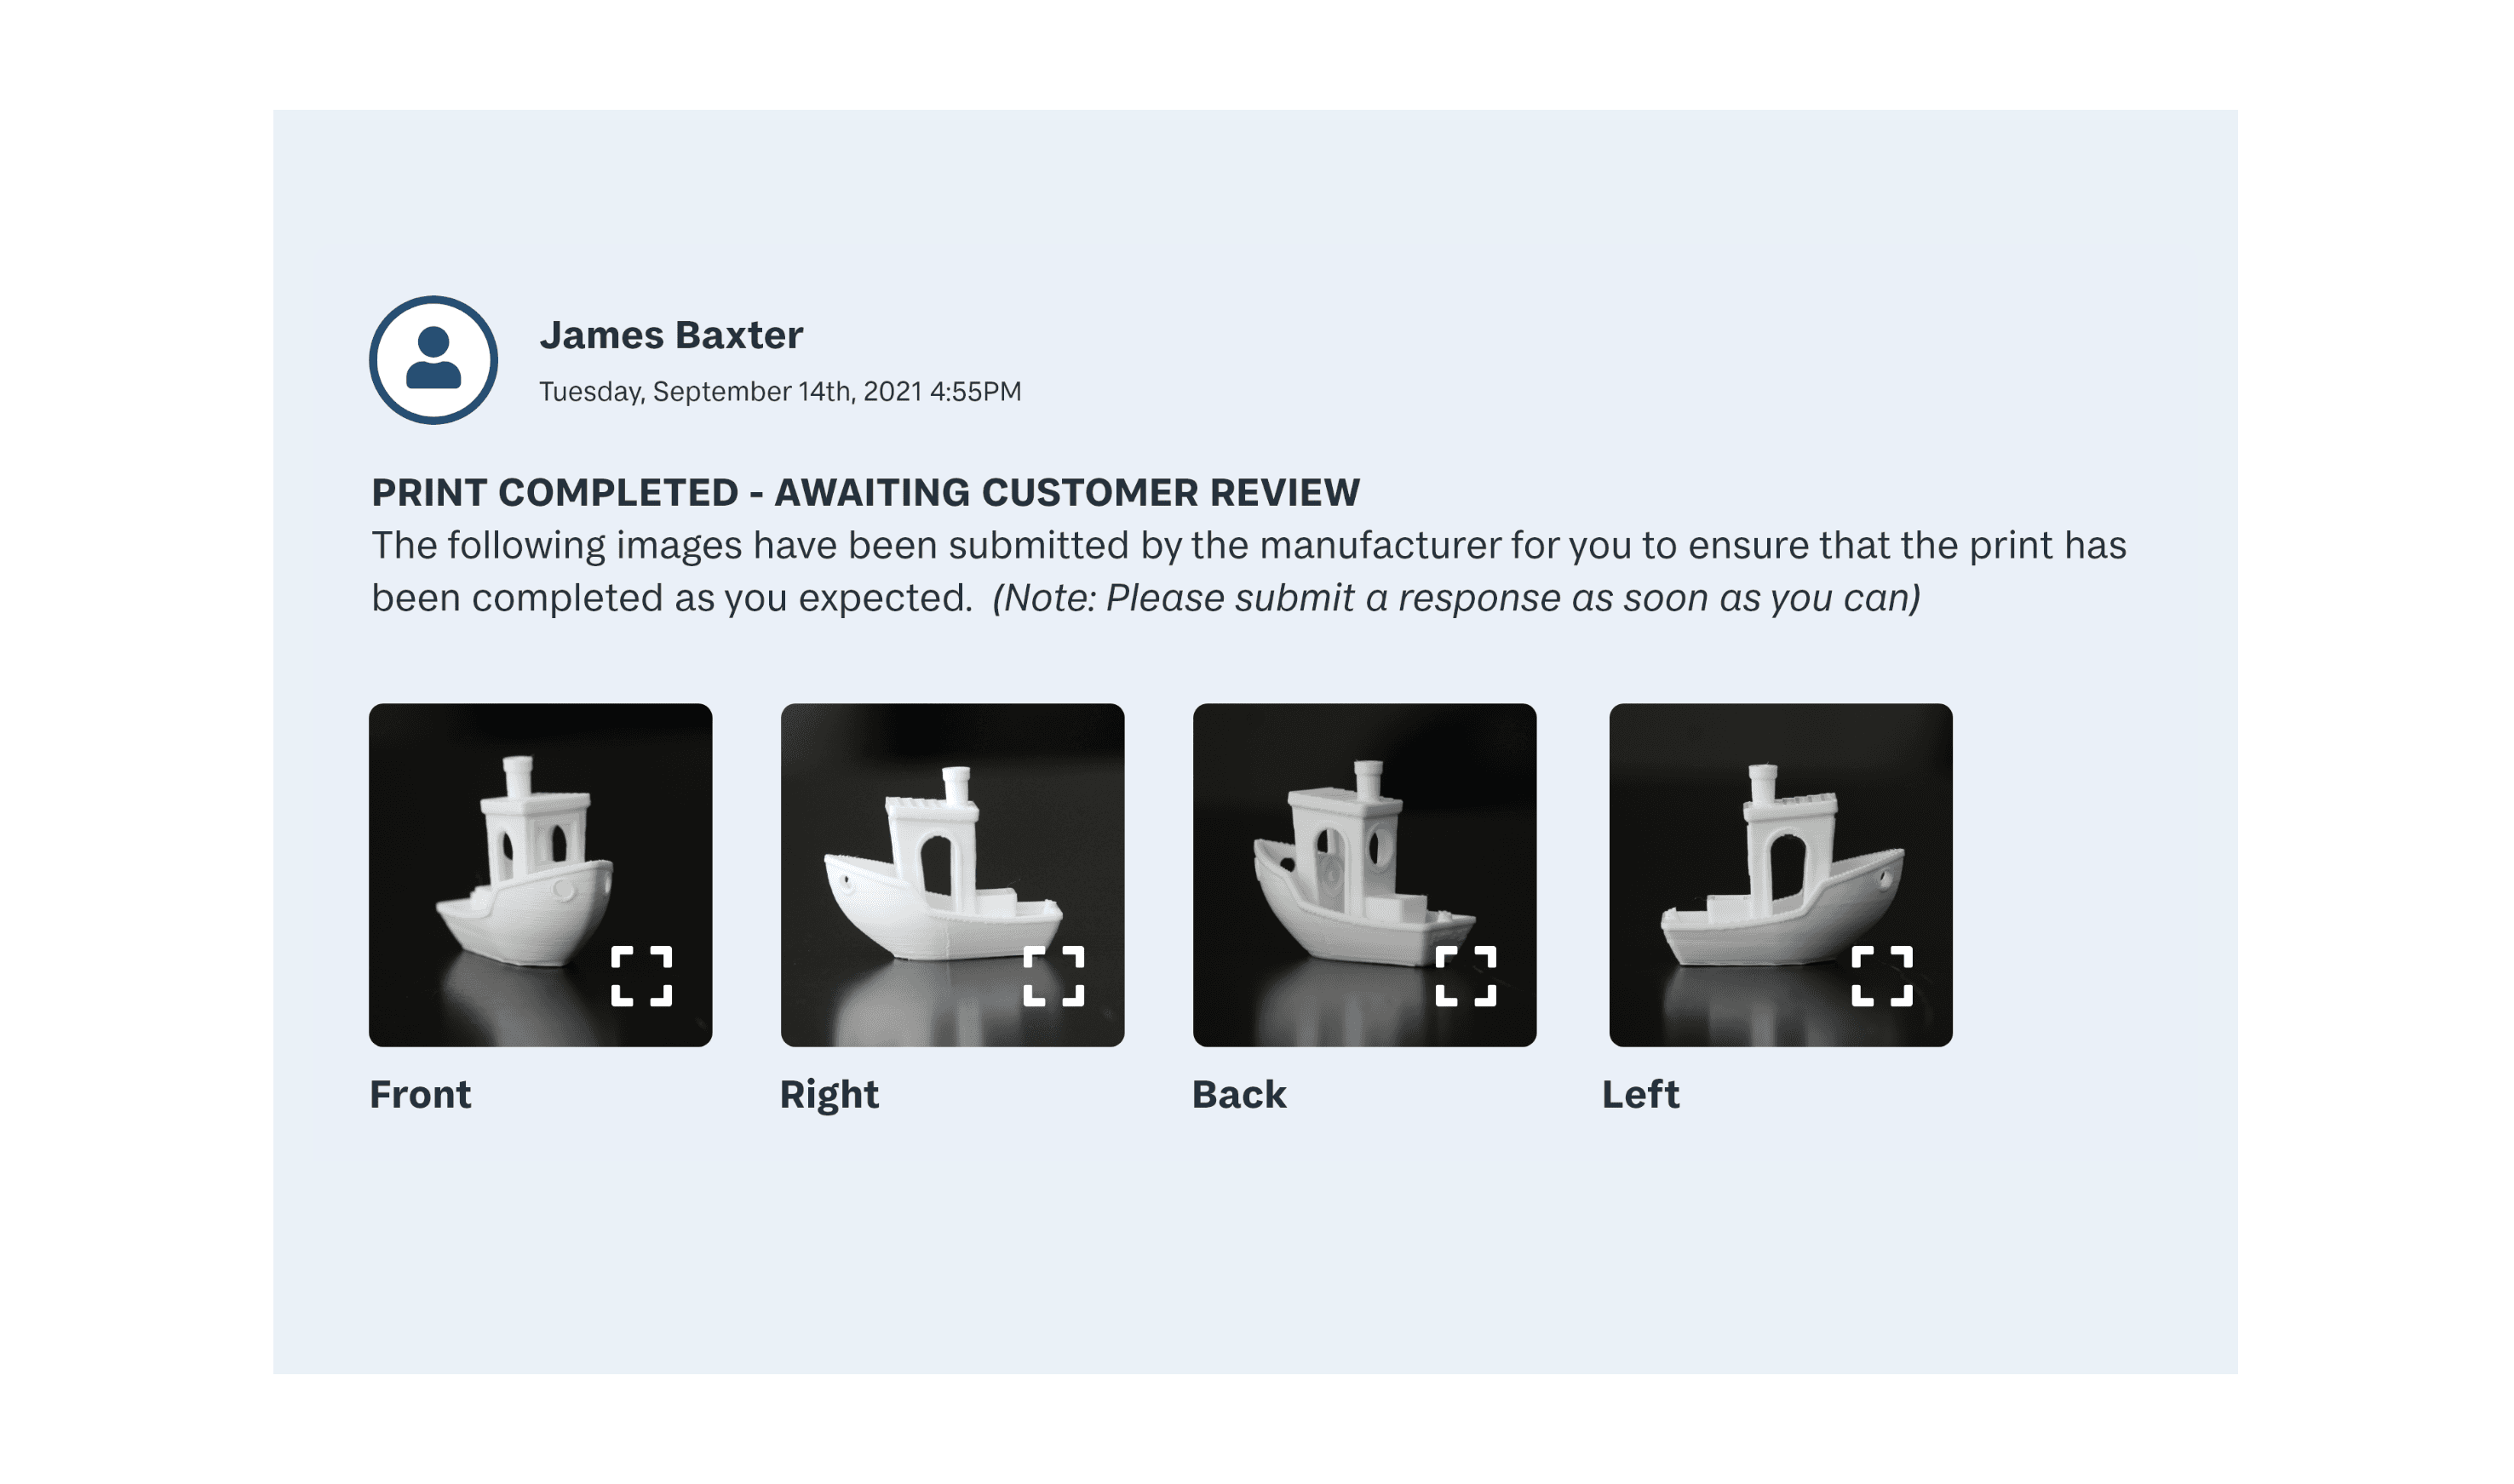
My Orders (print completed)
Print completed - 1/4
Description:
Once the print has been completed, the Maker submits verification images to the customer. This ensures that the customer is never surprised with the product that arrives at their front door, and can intervene if something appears off before shipping.
User Action:
Check through the photos, refer to the attached guide for a list of common issues, and click the appropriate response option.

My Orders (verifying print)
Print completed - 1/4
Description:
Once the print has been completed, the Maker submits verification images to the customer. This ensures that the customer is never surprised with the product that arrives at their front door, and can intervene if something appears off before shipping.
User Action:
Check through the photos, refer to the attached guide for a list of common issues, and click the appropriate response option.

My Orders (verifying print, expanded)
Print completed - 1/4
Description:
Once the print has been completed, the Maker submits verification images to the customer. This ensures that the customer is never surprised with the product that arrives at their front door, and can intervene if something appears off before shipping.
User Action:
Check through the photos, refer to the attached guide for a list of common issues, and click the appropriate response option.

Order ticket (print verified)
Print completed - 2/4
Description:
Here the customer has approved of the print, and is now waiting for the maker to respond with the shipping details.

My Orders (shipped)
Print completed - 3/4
Description:
With the item approved by the customer, the Maker has now packaged and shipped the item, and provided the customer with the necessary tracking info.

Order ticket (shipped)
Print completed - 3/4
Description:
With the item approved by the customer, the Maker has now packaged and shipped the item, and provided the customer with the necessary tracking info.

My Orders (delivered)
Print completed - 4/4
Description:
Once it has been confirmed that the package arrived to the customer, they have the opportunity to rate the Maker and provide feedback. Otherwise, the ordering process is complete and the customer can enjoy their product.

Order ticket (delivered)
Print completed - 4/4
Description:
Once it has been confirmed that the package arrived to the customer, they have the opportunity to rate the Maker and provide feedback. Otherwise, the ordering process is complete and the customer can enjoy their product.
Bringing 3D printing to everyday consumers
Connecting consumers to local hobbyist makers for cheap, customizable manufacturing
A browsable online storefront of ready-to-print 3D models, sourced from around the internet
Enabling makers to profit off of their equipment and skills in their spare time
Going Forward
With every feature added, countless more had to be sidelined for the sake of scope. Some of these improvements to the project include:
- A full branding refresh (the logo and name are temporary)
- Wider testing with relevant users, both customers and makers
- Overhauling the visuals and UX of the store page
- UX of user profiles
- Real-world tests with owners of 3D printers
Several team members would need to be added in order to become a dedicated company. Like algorithm engineers to help design the systems that assign orders to makers, and determine how much they get paid per job. Other additions include:
- More UX designers
- Wider testing with relevant users, both customers and makers
- Backend developers (some with cyber-security experience)
- Financial advisors

AREAS OF GROWTH
Considering entire userflows and journeys
makes for far better UI than individual features
When I began planning my approach to prototyping, I chose a number of the service’s most important features. From there, I intended to create mockups of each. Eventually, I reached the question of how the service would verify that a maker was capable and trustworthy. My solution was to have them create a mock customer order. But to prototype this, I would need to mock up the entire order fulfillment process. Only having a few select screens would be too disjointed.
At this moment, I decided the only way to consider all aspects of the service would be to build the 2 entire user flows. This caused a massive shift in my project approach. It allowed me to encounter numerous issues that would have gone unaddressed if I had only created separate feature screens.
This moment reminds me to always focus on the entire context of a user’s journey and experience. I need to avoid fixating on individual features without remembering the greater context of the system in which I’m working. Good UX design isn’t separated features in a vacuum, it’s the creation of an entire experience.
LEARNING
The importance of involving users as early, and as often as possible
In this project, I spoke with 10 potential users, in two separate groups before becoming invested in any concept or solution. This gave me important background information from which to build ideas. But equally valuable was my decision to involve this group once again after I had developed an idea. This allowed me to gather feedback on my concept, before having created any semblance of a prototype. This provided tangible validation that my ideas were worth pursuing, and a foundation of user feedback from which to expand and build.
This moment reminded me to always involve users as early and as often as possible. Often, designers forgo interviewing users in a project’s early stages. This is usually done in favour of instead testing before ideation, or after a prototype has been actualized. But, by keeping users close to my project at every stage, my solution became tailor-fitted to the exact problem that I had observed in the 3D printing space.
SUCCESSES
Creating actionable steps to achieving the core functionality of the service
I often questioned what the final outcome of this project should be. I felt strongly about this concept, and I needed to do it justice. Around the end of the first month, after much planning and revision, I had defined my goal of creating 2 user journey prototypes. With this finally established, I quickly fell into the groove of cycling through iterations week by week. I made screens, found testers, gathered feedback, implemented changes, and repeated. In the end, all the pieces fell together. Resulting in a polished, cohesive execution of my idea.
Despite many challenging time crunches during development, I steadily moved through each phase without any major snags. Working with a clear end goal, and defining actionable steps to reach it, is what brought this project to life. For this reason, the planning and organization of this project was its greatest success.